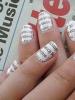
Which bookmarks are better paper or paper clips. DIY paper bookmarks
Take a break from a busy day and take some time for needlework. handmade- The best way relax and do something useful. For example, bright bookmarks! To make your reading more interesting, we will show you how to create original and fun bookmarks for your favorite book or diary.
#1 Magnetic bookmark
Materials:
Plastic folder for files
Bright paper with a fun print
White chalk or pencil
Ruler
Scissors
Glue
Magnetic tape on a roll
Step 1 Gather all your materials and find a free workspace.
Step 2. Determine the size of the future bookmark and cut out two rectangles of the same size from bright paper. If you cut one long strip, the pattern with the arc side will turn upside down when bent. This applies to paper with animal print, as in our version, and with patterns in which the top and bottom are clearly visible. If you picked up paper with abstraction, you can safely cut out one long strip.

Step 3. Attach the rectangle to the plastic folder in the bend area and circle it with a pencil or chalk. Then cut out the bookmark. When you unfold it, you should have one long strip with a curve in the middle.

Step 4 Glue bright paper to the outside of the bookmark on both sides.
Step 5. Measure and cut two pieces of magnetic tape. Glue them from the wrong side on both parts of the bookmark. Make sure that the second magnet is exactly in the same place as the first. This way you can pin the bookmark between pages and it won't fall out no matter how hard you shake the book.

Step 6. After the glue dries, be sure to try out the bookmark!

#2 Paper clip bookmark

Materials:
Scraps of fabric
Large paperclips
Scissors
Iron
Threads and wire
hot glue gun
Step 1. Cut out strips of 1.5-2 cm wide from shreds of fabric. Let the length remain maximum so that it is easier to form a bow.
Step 2. Smooth the fabric well with a hot iron so that it holds its shape. Then form a bow by tying the center with a thread.

Step 3. Using a small piece of wire, attach the bow to the paper clip and fill it with glue so that it does not slip.
Step 4. Cut a thin strip of fabric, 0.5 mm wide. When the glue dries, cover the wire and glue with it.
Step 5. At the very end, cut off the long tails of the bow, and the bookmark is ready!
#3 Bookmark with buttons

Materials:
Buttons on the leg
Large paper clips
Hot glue gun
Put the button on the paperclip and secure it with hot glue around the leg. Literally in half a minute you have an unusual and bright bookmark ready.
#4 Fabric bookmark with a flower

Materials:
Several pieces of fabric
Button
Threads and sewing machine
hot glue gun
Piece of cardboard or plastic
Step 1. Determine the dimensions of the future bookmark. Then fold the piece of fabric in half so that the fold is on the left or right side.
Step 2. Mark the dimensions of the future bookmark on the fabric and cut it out.

Step 3. Using sewing machine or hand-sew the fabric at the bottom and side, from the wrong side. Then turn the fabric right side out. Use a pencil to carefully push out the corners.
Step 4. Make one line on three sides, retreating a few millimeters from the edge.

Step 5. Take a thick cardboard (or a piece of plastic) and cut a strip to fit the future bookmark. Tuck it inside the fabric pocket. This way the bookmark will keep its shape.
Step 6. Sew one line at the top to secure the cardboard so it doesn't fall out.
Step 7. Using a piece of fabric twisted into a thin tube, make a flower. Sew a button in the center.

Step 8 Use hot glue to glue the flower to the top of the bookmark. That's all!
In our age modern technologies The book can be read on various electronic devices by simply downloading it from the Internet. But there are people who will always give preference to printed publications. These are people who love the smell of a new book, who turn the pages of printed pages with real pleasure. And this article is just for them.
In order not to spend too much time searching for the desired page, a bookmark is used. It's always been that way. And in this article you will clearly see how you can make beautiful bookmarks with your own hands from various improvised materials. It can be paper, and felt, and old film, and ribbons, and templates that you just need to print. We will only look at some of the ways.
It is easiest to make a beautiful paper bookmark with your own hands. Hundreds of options! Below we show some bookmark options for inspiration. In the meantime, we will describe how to make a bookmark in the form of a heart.
Necessary materials:
- White paper without lines;
- Cardboard (also white);
- Scissors;
- Unnecessary postcard;
- Glue (stationery)
- Simple pencil.
As you can see, these materials are not some unusual ones, but those that everyone, if desired, can find at home.
Procedure:
- We fold the paper diagonally;
- Below (in the corner) we draw the upper half of the heart;
- Cut out carefully. This is a template for a future bookmark.
- I put it on a postcard and circle it;
- We make a cardboard heart less than a paper one about half;
- We glue the details.

This is a very simple way, so you can make such a bookmark even with a child. You can also make origami bookmarks, monster bookmarks and other variations on the corner from paper, and much more. It would be inspiration.
This bookmark will also be in the form of a heart. Its plus is that it will not wrinkle or tear, as can happen with paper or cardboard bookmarks.
We need:
- Felt sheet;
- Scissors;
- Needle with thread.
How to create:
- Fold a sheet of felt in half, draw a heart on it and cut it out;
- Sew two halves with thread, except for the top. This is necessary to put a bookmark on the corner of the desired page.

In this case, you can include your imagination. The bookmark doesn't have to be a heart, it can be anything. For example, a triangle. But the principle of operation remains the same.
This is one of the options. In fact, you can make a huge variety of different bookmarks from felt. This is an amazing material, needlewomen know. Here are just a few bookmark options for felt books:
- with lace
- with a ribbon
- sewn in the form of flowers or animals,
- using felt and ice cream sticks,
- and many many others.


The paperclip itself can be a bookmark. But you must admit that just a paper clip does not look very attractive. I want the bookmark of my favorite book to look beautiful. For this you need:
- Paperclips;
- Beautiful or unusual buttons;
- Hot glue;
- Felt.
Stages of work:
- Glue a paperclip to the back of your chosen button;
- To cover this part of the paperclip, glue a piece of felt on top.

There are no restrictions here. Choose buttons of different shapes, sizes, colors and so on. Experiment, and you will surely be able to create an unusual and beautiful bookmark.
Just remember that a paper clip can ruin book pages.
No matter how strange it may sound, a beautiful do-it-yourself bookmark can also be made from such a seemingly unusual material as an old photographic film.
Materials:
- Old film;
- Hot water;
- Needle and thread;
- Scissors;
- Nice picture.
Algorithm:
- To remove photographs from the film, it must be dipped in hot water for several minutes;
- Carefully remove old images with a knife, without damaging the holes at the edges. The film should be transparent. The strips from the knife will gradually become invisible;
- Choose the desired length, fold in half and sew along the edges with colored threads;
- Insert a two-sided picture inside.

This is an unusual bookmark. It is expensive in stores, but making it yourself will cost you much less.
- Decor (any beads, pendants, etc.);
- Wide colored satin or velvet ribbons;
- Scissors and wire cutters;
- Glue, needles, thread. Think about what you want to attach to the tape. Start from this;
- To neatly trim the edges of the tape, you need tape clips.
Work steps:
- Attach the tape to the page and measure. Then lay it twice as much, because the bookmark will be double-sided;
- To choose the right combination of colors, attach different pendants and rhinestones to the ribbon and choose the one you need;
- We glue each tape properly, folding it in half;
- Attach a clip to the end of the tape;
- Hang your chosen decor.

Thanks to this bookmark, your book will look royal.
Bookmark with pompom
The pom-pom bookmark is very similar to felt ribbon bookmarks. Only there, instead of felt - pompom. To make such a bookmark with your own hands, we need:
- Knitting;
- Scissors;
- Cardboard.
Stages of work:
- Make a skein of thread;
- Tie it with thread;
- cut the edges;
- Straighten the threads;
- Glue to cardboard.
It's very simple, but no less effective method make a bookmark.
Bookmark with a bracelet
Such bookmarks are quite rare, and thanks to this, it will look even more beautiful.
What do you need:
- wire cutters;
- Thin wire;
- Various beads;
- Ribbon;
- Scissors.
Action algorithm:
- Make a small bracelet: take a wire and put beads on it, twist the ends of the wire and insert it into a bead. Choose the diameter of the bracelet yourself, there are no limits.
- Measure the length of the tape, which should be twice the size of the page. Tie it to a bracelet.
That's all. It looks pretty nice.
Suede bookmark
We will need:
- A piece of suede;
- Awl;
- Cutter;
- Acrylic paints;
- Waxed cord;
- A pen.
Work steps:
- Using a ruler made of metal with a cutter, cut out a rectangle of the size you need from suede.
- Along the edges with an awl, make holes that are at the same interval from each other;
- Lace up the bookmark with a cord. Life hack: to make the lace easily enter the holes, grease its end with superglue. Then it will harden and it will not be difficult to stick it into the hole;
- With a pen on the suede, draw the design or pattern you want to see on the bookmark;
- Acrylic paints paint what you have drawn. To make the picture bright, the paint can be applied in several layers.
A beautiful do-it-yourself bookmark made of suede is ready. It remains to wait until the paint dries, and you can use it.
Although it is simple to perform, it is very effective to use.
What do you need:
- A piece of scrap paper;
- Elastic;
- Cutter;
- Scissors;
- Pencil or pen.
How we do:
- Cut out a small rectangle with scrap paper scissors.
- On the reverse side, draw an arrow with a pen or pencil. Choose the size that is comfortable for you. The size of the rectangle also depends on this;
- Cut out the arrow. For a neater look, its edges can be rounded;
- With a cutter we make two cuts along the arrow. After that, we pass the elastic;
- We put an elastic band on the page of the book and tie it with a tight knot. We remove the excess parts with scissors.

Such a bookmark will help you find not only the page, but also the line where you left off, since the arrow can be moved.
Satin ribbon bookmark
This option can be done in just 5 minutes.
We will need:
- Clip;
- Satin ribbon (width according to your desire);
- Glue;
- Threads and a needle;
- Scissors.
How to do:
- Cut off a piece of tape about 10 cm long;
- Fold this piece into a beautiful bow;
- In the center, gather the fabric and sew them with threads or glue them together;
- Attach the resulting bow to the paperclip using a small piece of the same tape, wrapping around the center.
This is a fairly simple method that does not require too much time and money.
Template bookmark
This is a super easy way that doesn't require too much effort. Just find a template on the Internet to your taste, print it out, cut it out and you can use it.
As you can see, there are many ways to make a bookmark for a book yourself, with your own hands. Some bookmarks can be made with children, which, of course, is a tangible plus.
In addition, a self-made bookmark can be a very good gift, especially for someone who loves to dive into the world of books.
P.S. Ideas for creativity can be peeped on Pinterest (there are a lot of them, the photo is from there) or on YouTube.
To make it more convenient to use a textbook, notebook, magazine, you should not crease the corners or lay candy wrappers on the required page, it is better to use bookmarks. Paper bookmarks made in the form of woven strips, animal faces, flowers, bows look funny and pretty. There are many options for such crafts, we have collected the most simple and interesting of them.
How to make a paper bookmark using an envelope
This is the easiest way to make bookmarks. Prepare: paper, pencil, scissors, envelope, bright postcard.
- Fold the sheet diagonally, draw a petal on it and cut it out. Straighten the figure - you get a stencil-heart.
- Attach the template to the corner of the envelope and cut out the base of the craft on it.
- From a postcard, make a heart smaller than the first one, attach it to the base of the corner and you can use the bookmark.
How to make a paper bookmark
Such gizmos are made quite simply, so invite children to creativity. Take: colored cardboard and paper, scissors, glue, pencil, ruler, awl.
- Cut a rectangle out of blue paper and fold it in half. The size of the figure is 20 by 5 cm. Cut the middle line of the workpiece at an angle, leaving 0.5 cm from the edges. Expand the segment and bend the cloves through one, getting an ornament, like on a New Year's garland.

- Glue the blue base on a red cardboard measuring 22 by 7 cm. Cut off the corners of the red base.


- Poke a hole in the narrow part of the product with an awl, tie a thread with a small pom-pom and - a simple but elegant craft is ready.


How to make a paper bookmark - corners
Corner bookmarks will help you open the notebook in the right place and prevent damage to the pages.
- On a piece of paper, draw 3 squares with a side of - 6 cm. The figure that comes out should resemble the English letter - L.

- Draw diagonals in two squares - upper and lower. Shade the triangles as in the diagram.

- Cut off the shaded parts and, according to the resulting template, prepare a green cardboard blank.

- Cut out a figure from bright paper and glue it to the center of the stencil.


- Fold the right green triangle inside the base, and spread the left one with glue and press it on top of the right one. You have a bookmark-pocket, it remains to revive it a little.

- Make eyes, teeth, a smile out of paper - whatever you like and glue them on the upper and lower triangles, respectively.

How to make a paper bookmark - origami
To get started, try folding a bookmark out of plain paper, and having mastered the technique, work with colored blanks.
- Fold the square sheet first horizontally, then vertically in half.
- Fold the bottom of the sheet down the middle. Turn the workpiece over to the other side, fold the edges into a triangle and turn over again.
- Move the nose of the resulting bird up, turn it over again. Open the formed pockets with your finger by pressing on the fold lines, and you will get a figure of a flying butterfly.
- Bend the lower lobes and vertices of the outgoing triangles and turn the base over to the front side. Fold the product along the dotted markings, securing the corners and the back wall with glue.

- Decorate the bookmark as you wish - with stickers, applications or a pattern.


As you understand, a paper bookmark is made quite simply and quickly. So turn on your imagination and make original gizmos that will not only revive your favorite books, but also become an unusual gift for your friends who appreciate the printed word.
We have made a large selection of the most diverse ideas, where you will find the most that are very easy to do with your own hands. In this collection, each student will find something interesting for himself and become even more exciting.
We offer you a selection of amazing bookmarks for books that everyone can use for their own pleasure. With such original bookmarks, you will want to open the book even more often. It remains only to choose the one that you like the most, and start creating such an interesting one. In addition, September 1 is almost on the nose and reading of books will definitely increase. So why not make this process even more fun?
25 bookmarks you can make yourself
The simplest version of a bookmark, which is very easy to make with your own hands, is a flat cardboard bookmark with tabs to cling to the page. Choose who exactly will hold the book page, cut out the lead and start reading your favorite book.

Bookmarks for books on rubber bands are a very convenient option, because both inside the book and from its outer side, nothing will look out and, accordingly, will not be wrinkled.


And if you sew a small pocket to the elastic, you get a kind of one in which you can store pens or pencils, or stickers to mark important moments. This bookmark is suitable for textbooks or notes.

Corner bookmarks attract book lovers because, firstly, they are very easy to make, and secondly, such bookmarks can be very different: with eyes, teeth, overhead elements, or with interesting phrases. Such bookmarks for books will especially appeal to you.


Knitted or crocheted bookmarks will immediately show that this book belongs to a real needlewoman. Such a bookmark can be a great gift, because knitted sweaters and scarves are so commonplace.

From the herbarium, not only beautiful applications are obtained, but also very gentle bookmarks for romantic natures who love to dream and admire nature. - read the link.

Even ordinary paper clips can be turned into bookmarks. Attach a tassel of yarn or a figure cut out of cardboard to the top of each paperclip - and voila! - your bookmark is ready.

Bookmarks for books are also possible. The easiest way is to paint the wand with paints. A more difficult option is to glue a figure or attach a letter on a thread. The choice is yours!


A knitting thread braided into a pigtail and a beautiful button - that's a new bookmark for your favorite book, which is very easy to make with your own hands. Attach a button at one end and loop the other end to "button" the bookmark.

A paper bookmark in the form of a pen and a favorite quote or inspirational phrase - what can inspire you even more to new feats and conquer new heights?

Yarn tassels are suitable not only for, but also for original bookmarks. All you need is cardboard and some yarn. From cardboard, make a bookmark of the required shape, and turn the yarn into a beautiful brush.

Or simply braid the threads and tie them on cardboard, so the flat cardboard part of the bookmark will be inside the book, and the tassel will hang down and point to the place where you stopped reading.

If you have beads from a broken bracelet or pendant lying around, use them to bookmark your favorite book. String beads on a thick thread or leather cord according to the principle.

Another handy option for bookmarks is to use fabric or felt and ribbon. For each new book, you can make a different bookmark with the main characters or the most memorable item from the book. Fantasize!

Now you have a whole collection of amazing DIY bookmarks that are easy to make. And if in, you are on the side of the first, then a beautiful bookmark will be a real gift for your paper friend.
Not a single child can do without a bookmark. If he is still a preschooler, then before going to bed he always reads fairy tales with his mother or grandmother. And the last page must be marked - for this you will need such a little thing as paper pigtail bookmark . Schoolchildren can’t do without one bookmark, because they have a lot of textbooks, as well as books for extracurricular reading. And you can simulate wonderful bright bookmarks yourself from paper or other materials. This lesson shows a variant of a two-color pigtail bookmark, which can be woven from paper strips using a special technique.
Let's consider step by step how to do it.
To create a bright pigtail bookmark, prepare:
- red and green two-color paper;
- scissors, a ruler and a pencil (if you have quilling paper, then these tools are not needed);
- a thin satin ribbon, gold lace or textured rope;
- two beads;
How to make a paper bookmark with your own hands
We recommend that you make a bookmark from contrasting colors of paper so that it turns out to be unusual and elegant. If you have thin strips of quilling paper, then take 4 strips - 2 strips of each color. From large A4 sheets, cut 2 thin strips. Using a ruler and pencil, draw lines, then cut out according to the template. The width can be 1 cm, and the length can correspond to the long side of the A4 sheet.

Prepare 2 pairs of strips for work. These are the main pieces.

Glue the first pair of strips at a right angle. Apply a drop of glue to the very end of the strip. Align the second strip, clearly adhering to the corners, press down on top with your fingers.

Next to the top strip, glue the first green one, adjoin it clearly to the red part, and also strictly observe a right angle.

Glue the second green strip on top with an overlap, aligning the edge with the edge of the workpiece.

Bend the right red strip to the left so that the sides of the parts are clearly aligned.


When you reach the end, glue the ends.

Prepare a thin satin ribbon and beads for tassels.

In the upper corner, make a hole with scissors or an awl, insert a ribbon into it, tie it in a knot. Thread beads onto the ends of the ribbon (one at each end) and tie knots so that the beads hold well. At this stage, you can also use a golden lace or other bright rope. At the bottom, you can mask the place of gluing the ends of the strips behind a paper emoticon or a cartoon face. By cutting out a suitable part from a children's magazine or packaging.


The bookmark in the form of a red-green pigtail is ready. This homemade little thing will definitely come in handy for a child, and you can make other options using suitable shades. Unusual weaving is sure to appeal to young creators, and Paper Pigtail bookmarks will look great between the pages of your books.