How to make a dove out of paper with your own hands step by step. How to make a paper dove with your own hands, paper bird Dove of peace from corrugated paper
Among all the paper crafts, one of the most popular is the dove, which personifies the desire for a peaceful existence. Pigeons can be used to decorate a room or as a children's toy; modules and garlands of large and small pigeons look no less attractive. To make a bird of the world in any technique, you will not need much time - 10 - 15 minutes will be enough.
Do you know what methods of making paper doves exist?
A dove can be made from corrugated paper, from napkins, cut according to a pattern and glued. It will be easiest for children to cope with the application.

DIY materials
In order to make a dove, you will need medium-weight paper. You can buy a specially designed for creativity or take ordinary office sheets. The dove will look good in both glossy and matte paper. The kids will love the colored paper doves that can be decorated with beads, ribbons, glitter glue or sequins. Watercolor paper or square origami sheets will do.

Advice
Sometimes a beautiful decorative element is made from pigeons, reminiscent of a "dream catcher". To do this, the birds are attached to twine and hung from the hoop.
- We'll need square sheet paper. We bend it diagonally so that we get an isosceles triangle.
- We fold the triangle in half again, then again, while wrapping the top layer in one direction, the bottom layer in the other.
- We bend the top of the resulting triangle to its base on one side, then on the other.
- Expand the triangle. If you did everything right, you will see folds inside the figure.
- We fold the triangle in half, and wrap its upper part along the folds inward. We do this on both sides.
- We bend the wings of the bird up.
- To form a beak from the side of the wings, we bend down the corner of the triangle, after which we turn it outward. The dove's beak is ready.
- From the opposite side of the beak, bend down the tail. You should get a blank that looks like a kite from above.
- Around the tail, we bend inward one half, then the other.
- Dove is ready.

Conclusion:
Even a child can make a beautiful dove out of paper. The main thing is to consistently perform manipulations and the origami bird will be ready. It remains only to decorate it - you can draw eyes or put a green twig in the beak.
paper dove
How to make a dove out of paper
Origami paper dove
Such a branch of the poultry business as breeding pigeons requires the farmer to be fully committed. These beautiful birds remain healthy and produce high-quality offspring only when many mandatory conditions are met. One of them is the presence of a comfortable dovecote, built and equipped in such a way as to be ideal for birds to live in the summer heat, winter cold and unstable autumn-spring weather. In this article, we will tell you how to build a dovecote with your own hands to grow and breed a healthy population of birds.
The farmer will be able to equip a comfortable dovecote only in one case: when the place of its intended location is far from the city, with its noisy streets and constant movement. This requirement has the following justifications.

First of all, you should understand that comparing the rare breeds of birds that you are going to deal with with urban pigeons is at least stupid, since the latter lack both health and long life expectancy. Of course, they have developed a certain immunity to the gasoline exhausts and noises present in the city, and they can live crippled for a long time. But, ultimately, the high mortality among urban pigeons is no secret to anyone.

Video - How to build a dovecote
Additional requirements
Now we will stipulate additional requirements for the placement of birds. Near the bird house should not be:
- electrical lines;
- cesspools;
- neighboring poultry houses, chicken coops, pigsties, etc.
Electric lines, as a rule, cannot be avoided, because now they are present everywhere in villages and villages, but do not worry, over time, pigeons will learn to bypass this air obstacle.
![]()
Now about cesspools and dwellings of neighboring birds and animals. All of these facilities are a source of infectious diseases. Pigeons are particularly susceptible to them, so placing a dovecote in the vicinity of the above places is strictly prohibited.


Types of pigeon houses
Before proceeding with the consideration of the construction process, we will consider what varieties of dovecotes exist.
Hinged dovecote
This variety can be called a rural economy option. It is this that amateurs often build in order to keep inside a non-pedigree bird in small numbers, one or three pairs. The appearance of such a bird house resembles an ordinary wooden box, which is attached to the outer wall of the house, under the roof itself.
We present a comparative table of the advantages and disadvantages of mounted pigeon houses:

Specifically, mounted dovecotes are not suitable for breeding. Their undoubted advantages include the low cost of materials and the ease of manufacture of the structure, which is why they are very popular in the villages. However, such poultry houses cannot serve as a refuge for birds from frost or wind, just as they cannot save them from the attack of predatory animals or birds. Among other things, their location makes the process of caring for a bird so difficult that over time it discourages any desire to engage in this branch of poultry farming. The high mortality of chicks is largely due to the presence of a hanging dovecote, because it is simply impossible to constantly monitor their health and development.
dovecote tower
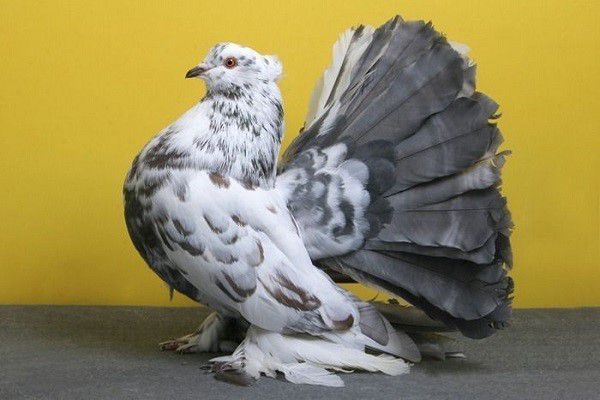
Such a dovecote cannot be compared with a hinged one, as it is more practical and suitable for breeding thoroughbred birds. Usually it is erected in the form of a tall structure, which can reach 4 meters, in the form of a rounded tower.

Inside the tower dovecote, the following arrangement of residential pigeon sections by floor is accepted:
- the first floor is given over to a warehouse for equipment and feed for pigeons;
- the second and subsequent floors are occupied by nests.
Each nest is separated from the others by walls. The interior space of the room must remain free so that access to the nests is always open.
We present a comparative table of the pros and cons of tower pigeon breeding.
The tower structure of the poultry house is attractive for its unconditional practicality, it is perfect for achieving the breeding goals of the poultry breeder. However, the price of materials that will be required for its construction will hit the insolvent farmer in the pocket, in addition, requiring significant labor costs from him.

The main question that you must honestly answer to yourself is what are you ready to do in order to do what you love? If breeding pigeons is just a temporary hobby for you, you should not make an expensive dovecote. However, remember that even ordinary pigeons have difficulty in the cold in a dovecote.
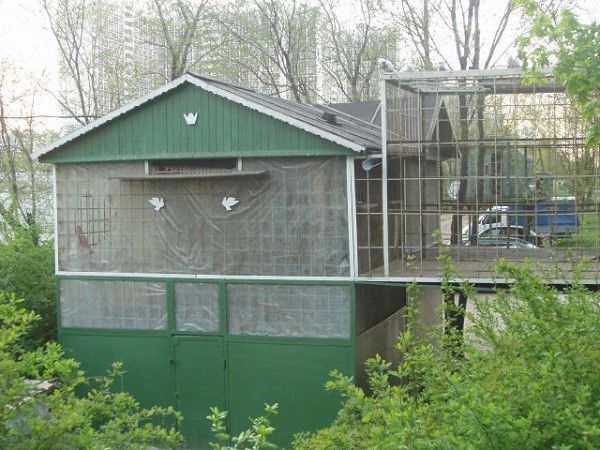
Dovecote in the attic
The most optimal and convenient location of the dovecote for successful breeding. The attic arrangement of a pigeon dwelling does not require serious investments and hard physical work, since the room under the roof will only need to be supplemented with a bird walking area.
It is best when the pigeon attic is located on a solid house adjoining building, on the ground floor of which you can keep tools, bird food and other devices. The building must be insulated.

Avoid drafts inside the attic, some breeds of pigeons are very sensitive to them.
We will discuss the advantages and disadvantages of attic dovecotes.
As you can see, this method of placing a dovecote has an overwhelming amount of advantages. As for cleaning, it will have to be carried out in any case, this minus accompanies the breeding of birds in any room. Next, we will consider the construction of a dovecote in the form of an attic superstructure above the adjoining premises and a dovecote tower.
DIY dovecote in the attic
Depending on what material was used to build the base house, the attic can be built from:
- tree;
- bricks;
- gland.
In the case of each of the selected materials, there are nuances.
A wooden building requires filling internal joints, joints with the roof, as well as sheathing the room from the inside with plywood sheets so that the internal microclimate is not disturbed by drafts and excessive humidity from the outside. Brick walls are puttied in a similar way, however, they do not need plywood sheathing. The metal superstructure is sheathed from the inside over the entire area with wooden boards, then with plywood sheets of small thickness.
Prices for building boards
Building boards
Parameters of the future dovecote
There are basic parameters that must be observed when building a dovecote.
- For each pair of pigeons inside the bird's dwelling, there must be at least 50 cubic centimeters.
- The room is divided into compartments to keep different breeds of birds separately or to separate them by age.
- The capacity of each compartment is no more than 15 pairs of pigeons.
- In winter, birds are seated by gender;
- Be sure to have a section for young animals.
- The construction project takes into account the place for placing feeders and drinkers.

The height of the future pigeon dwelling should be at least two meters. The outdoor walking area is usually built in the form of an equilateral square. The larger the pigeons that you breed, the larger it is.
The location of the notch also depends on the size of the bird. Breeds of a sports orientation need to be placed at about 1.5 meters from the floor, meat birds - and a height of 30 centimeters.
Let's start building
Walls
First of all, you need to build walls. If wood is chosen as the building material, assemble the frame of the future room from the bars and cover it with boards inside and out.

Floor
The floor of the dovecote is made of wooden boards laid one after another. AT winter period it must be covered with straw or soft sawdust to increase the level of heat inside the room and protect birds from various diseases.

Roof
Now you need to make a frame lattice for the roof. Any material can be used as a coating, the main thing is to make hydro and thermal insulation to avoid wind and rain penetrating inside.
Window
The well-being of pigeons and the heating of the room also depend on the correct placement of windows. By placing the windows on the eastern and southern sides of the building, you will give your feathered wards a lot of light and warmth.

walking area
We are building a fly. This building element looks like a small platform on which pigeons can land and take off from it.

Now you need to build the walking area itself. Usually it is made from a fine-mesh metal mesh. It will be good if the size of the walking area corresponds to the side of the roof on which it is located. The floor area of the walking room can be covered with thin sheets of plywood directly on top of the mesh.

So that pigeons can fly out for walks in the summer, make another notch outside the walking area.
Prices for mesh netting for dovecote fencing
Rabitz
Ventilation
One of the conditions for the healthy keeping of any bird is good ventilation. The least expensive way to arrange a ventilation system is an additional mesh door to the room, which is attached next to the wooden one from the inside of the room. When it's hot in the house, open the wooden door to let in fresh air.

An additional door made of fine mesh metal mesh is the easiest way to ventilate the room
The arrangement of the hood on the ceiling of the dovecote will also not interfere, which, along with cooling, will also take away excess moisture, as well as unpleasant odors.
To keep the air inside the house always fresh, organize one or two small barred windows at floor level.
Heating
According to the recommendations of experienced farmers, it is not worth doing heating in the dovecote, but you need to take care of the pets and caulk all the cracks, as well as insulate the floors. In autumn and winter, it is necessary to constantly change the insulating litter inside the house to avoid dampness.
There is a trick. In cold weather reaching -40 degrees or more, pour warm, not cold water into the drinkers for the pigeons, and also give them nutritious food. These folk wisdoms, in combination with high-quality finishing of the premises, solve the problem with heating.

![]()
Internal construction work
After the external construction work is completed, you can proceed to the internal.
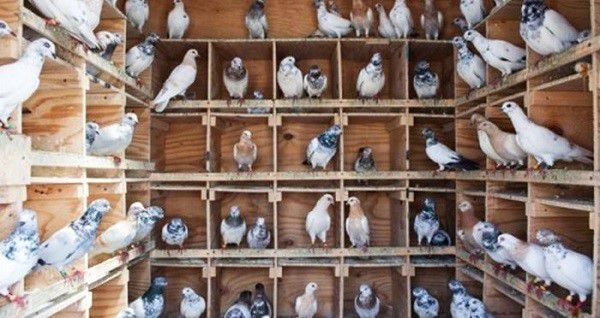
We design perches
At a distance of at least 30 centimeters from the ceiling, we place long bars, about 4-5 centimeters wide, and equip them with thin-walled rails. Such perches are usually placed in rows going down. Now you need to divide the perches into equal sections - nests. They are shaped like a box. Each cell is separated from neighboring cells by walls.

Approximate parameters for each slot will be as follows:
- width - 40 centimeters;
- height - 35 centimeters;
- length - 75 centimeters.
To save money, you can build boxes of the specified parameters from plywood, and install them in a row one above the other. And move the perches to the opposite side of the house.


Pigeon nest prices
Pigeon nest Ø23 cm
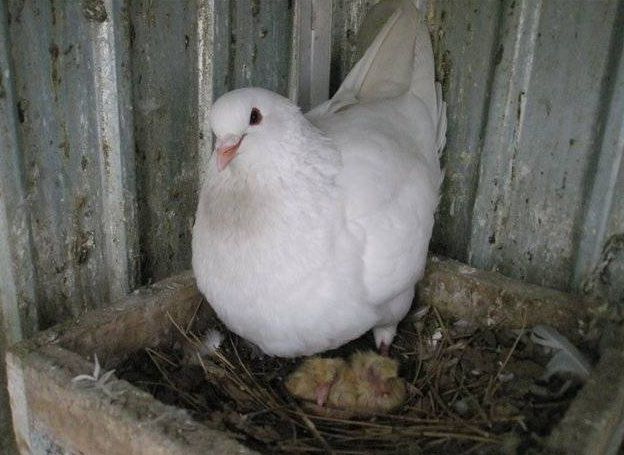
In addition to building the nests themselves, it is necessary to provide the birds with bedding, however, do not lay it in the boxes yourself. The fact is that pigeons approach the flooring of the nest creatively, choosing the softest straw and a convenient twig. Just leave them the following materials on the dovecote floor:
- hay;
- straw;
- small branches.
If you want to breed pigeons and have your birds lay eggs, you will need nests. What should be the correct nests? What can you make a nest with your own hands? Read about it at. Step by step instructions, photos, videos.
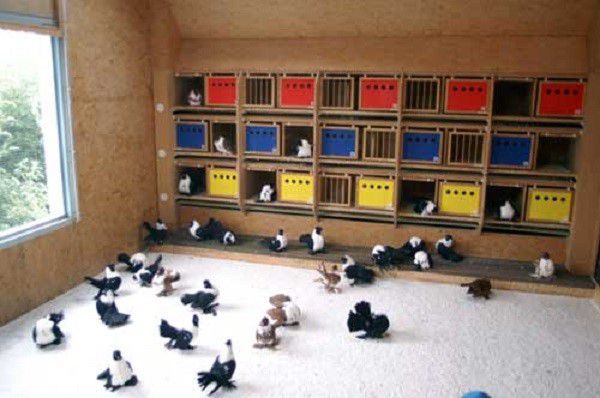
Drinkers and feeders
It is best to equip the pigeon house with drinkers and feeders that dispense the contents automatically, without human intervention. Their number is determined depending on the size of the number of birds. However, in addition, install a few old-style feeders to fill them with mineral feed.
A properly assembled feeder is the convenience of pigeons and the savings of the owner. Read on to find out how to make your own pigeon feeder. Requirements for feeders and their parameters, how to choose materials for feeders and drinkers, step-by-step instruction. Heated drinker.


For adult pigeons and young pigeons, separate drinkers and feeders are equipped in different parts of the room.

![]()
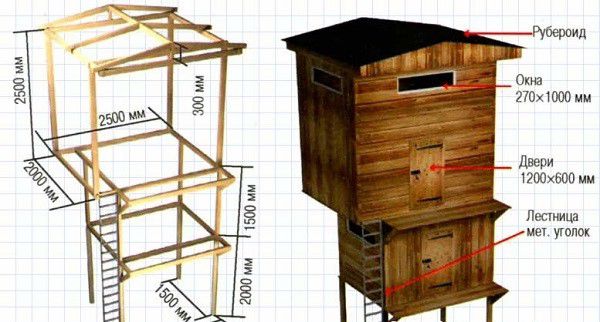
Tower dovecote: step by step instructions
We are starting to build a dovecote tower.
Step 1. We install wooden support pillars in the shape of a square, each side of which is 1.5 meters. The height of each log is 2.5 meters, 0.5 of which are dug into the ground.
Step 2 Having measured about 1.5 meters from the ground, we connect the poles to each other with fasteners made of wooden beams to increase the level of rigidity and stability of the structure. The parameters of the beam are 100x100 millimeters.

Step 3 The upper ends of the wooden poles installed by us are also connected with a frame made of timber, each side of which is 2 meters. We carefully fix all the joints of the parts and fasten each other with bolts and nails.
Step 4 We lay a wooden board on the resulting frame. This is the future floor of the dovecote, which we will then cover with soft bedding. It is best to grind the boards before laying them on the floor, so you minimize the chance of splinters in the delicate pigeon's feet.

Step 5 At the corners of the resulting site, we install frame pillars, the height of which is 1.5 - 1.75 meters. On top of the resulting "skeleton" we put another frame made of timber 100x100.
Step 6 We line the upper frame with a board, like a floor. We got our ceiling. Now you need to install the roof of the building. She may be:
- lean-to;
- gable;
- four-slope.
From precipitation, the roof is protected by sheets of roofing iron, which is firmly laid on top. Then, the attic space is puttied and insulated by any convenient means.

Step 7 The side poles are sheathed with a fine-mesh metal mesh. On the one hand, a snap-on transom is installed in it, with parameters of approximately 50x50 centimeters.
Step 8 Inside the site, a second room is installed - a blank box of boards, between the floor and the ceiling. A door is mounted on one side of the box so that the owner can visit his wards. On one side of the box, nests and perches are installed in a row, according to the instructions from the attic arrangement method.

Step 9 At a height of 1.2 meters, pigeon entrances are made, in the form of a small arched window, with a base width of 20-12 centimeters. The entrances are made small, but frequent, so there will be enough for all your livestock.
Step 10 In order to extend daylight hours for your birds, it is recommended to bring electricity to the turret and install a lamp or several lamps under the ceiling.

Step 11 A ladder is attached to the floor of the building from the ground, which can also be assembled independently from:
- 2 thick boards;
- sawn short boards set at a slight angle.
It leads to a hatch, which must be installed in the floor of the site in order to periodically visit their feathered pets.
Step 12 As an additional ventilation element, a closing pipe is installed on the roof. Shutters should also be prepared for entrances, by analogy with human village houses, in order to close them in case of severe frosts.

Summing up
As you can see, every farmer who knows a little construction tools will be able to equip a feeder, absolutely without resorting to the help of professional builders.
According to the scheme for building an attic for pigeons described in the article, it is possible to rebuild a dovecote from scratch, without using the finished ground floor as a basis.

When choosing materials for construction, remember that the health of your wards and their offspring depends on their quality. Puttying and insulation are essential elements of construction work, because pigeons react most sensitively to drafts and high humidity.
Video - DIY dovecote
Recently I was asked - how to make a dove mask. To put it bluntly, it's a difficult question. The Internet is full of photos of factory-made pigeon masks of something like this:
Well, I must admit - the similarity is very convincing. But, considering these masks, I understood that I would not build such a structure either from paper (cardboard) or fabric. And there is no need - a mask-bag on the head with two holes for the eyes should be insanely inconvenient in practical terms.
And then how? Well, let's try the same principle as . But it is necessary to introduce specific pigeon features.

What do we see? - A very prominent forehead hanging over the eyes and giving the impression of a scowl and a slightly hooked beak with a white cere at the base.
At the first stage, we will try to make a powerful forehead. Let the pattern be like this. This is in relation to sheet A4:


This is exactly what will provide the bulge of the forehead:

Now let's start and glue the tucks on the forehead and glue the triangular inserts on the temples:

The base of the mask is ready.

It's time to decorate it with a beak. The pattern will be like this:

A strange fringed detail will serve to connect the halves of the beak from the inside at the bend. We glue it like this:

Glue the finished beak into the armhole of the nose by bringing the side flaps to the wrong side.

At this stage, it is very important to make sure that the mask is symmetrical.
Let's try on the face - the view is quite birdlike. And how to make wax over the beak?

Well, I cut a cotton pad in half and glued both of these parts onto the bridge of the mask - it turned out to be very voluminous.

Let's paint on large black nostrils - and here's the mask of a white dove.
But those pigeons that we see in the city are blue-gray. If you need reliability - paint the mask in a grayish-bluish color. You can even purple - the audience will easily accept this convention.

In the picture, I also painted orange eyes - the look became pigeon one hundred percent. But in practice, I don’t advise sticking such decorations into the eye slits - they will greatly narrow the field of view. All in all, do as you please. I myself prefer the white version - a sort of dove of peace.
Origami means "folded paper" in Japanese. Initially, the art of origami folding was common among the upper classes. Possession of the technique of folding paper figures was considered a sign of good taste. This art went beyond the East after the Second World War. Now the whole world is engaged in folding paper figures.
From light-colored paper, you can fold a dove, which, as you know, is a symbol of peace. As you probably guessed, today we will show you how to make a paper dove step by step. Folding it is easy, and this master class describes the most convenient way. It is best to fold the dove from blue-toned paper or from an ordinary white sheet. Now on sale you can find a special square paper for origami.
First, the square must be folded diagonally to make a triangle.

This triangle is then folded in half.

Now you need to fold the triangle in half again, but wrap its top layer in one direction.

And wrap the bottom layer in another.


Then do the same on the other side.

The triangle must be unfolded, folds have turned out inside.

Now the triangle folds in half, at the same time its top folds inward along the folds.

Here's what should happen - a top view.

The same manipulations need to be done on the other hand, you get such a blank dove - a top view.

Now you can bend the wings of the dove up.

In order to make a beak for a dove, you need to bend a small corner.

And then turn it inward along the folds.


Expand it so that you get a figure that looks like an inverted kite.

Bend first one half around the dove's tail.

Then the other half. Got a tail.

The dove of peace is ready! For realism, it is better to round the wings a little with scissors. You can cut out a branch of green paper for the dove, which he will hold in his beak.

The final look of the craft.