Perfect for those who don't like hats! Super fashionable headdress with your own hands. Cutting and sewing a cape with a hood from a Pavloposad shawl How to get recipes
Very soon the cold will come and you will have to get out of wardrobes and cabinets warm jackets, coat, boots and scarves with caps. My least favorite of these are hats.
Not all women like the usual hats, and there are many reasons why we do not want to wear them in everyday life. For example, the fear of ruining your hair, headaches from tight fitting, and so on.
But recently I found the perfect solution for myself - a hat-hood, it's also a hood. This headdress very comfortable, practical and original. One of the main advantages of the hood is that it combines two accessories - a hat and a scarf.
It warms well not only the head, forehead and ears, but also the entire neck, and sometimes the shoulders and back, if the hood is elongated.
bonnet
Caps-bonnets were used in the 19th century. Then this headdress was like a hat and cap with hard brim. It was fixed on the neck with the help of strings from satin ribbons. Over time, its style has changed, the hood has become a more popular and comfortable headdress.
The hood began to be made from comfortable materials and without satin ribbons. In the 90s of the XX century, this model was incredibly popular and was included in the wardrobe of almost every woman.
Fashion is cyclical, and now the bonnet is once again becoming a hit, many women who follow fashion are beginning to acquire it. current trends in vogue. And they are absolutely right!

Not only fashion designers, but also famous actors are actively taking up the idea of such a comfortable headdress. For example, Ekaterina Volkova created her personal brand based on the hood.
The actress says that once, having unfastened the hood from her coat at the request of her mother, she tried it on as a separate headdress. I looked in the mirror, tweaked this “hat” on my head a little - so the idea arose to create such an interesting and unusual headdress.
 Soon Ekaterina developed a whole collection of hats for all occasions and for every taste. The trick is that such a hood has two sides, each can be worn depending on the mood.
This is a combination of different textures - lace with wool, lace with silk, wool and silk ... This headdress is perfect for both everyday wear and special occasions. For example, by making a bonnet from silk or lace, you will get a great wedding accessory. And fleece hooded hats are perfect for children and even for men.

We were impressed by this idea, and we have prepared for you simple patterns, which will help to sew in no time trendy handmade headwear. Perfect for those who don't like hats!
The pattern is one for all sizes (fortunately, the size of the head is approximately the same for everyone) and consists of three parts: two side and back. For each layer, you need to cut out 1 insert piece and 2 side pieces. Seams can be omitted, as they will not be visible in the finished product.
This is convenient for those who have not acquired an overlock or a machine with a zigzag stitch.
 The loop should be sewn immediately on the right side before the product is turned inside out, but it is better to sew on the button after trying it on. This will allow you to adjust the tension and position of the hood on your head.
 Here's what the end result should be.
 And how do you like such a stylish solution?
 And I just love this one. Perhaps this is the hat I will sew in the fall.
 There are also options for a hat-hood made of fur.
 Or these original knitted hoods.

As you can see, such a headdress is so versatile that it can fit any look, it will be appropriate in any season and weather. From what material to sew a fashionable hood - you decide, think about your needs. It can be an easy option for a summer evening in silk and lace, or it can be insulated. fleece for winter or fur.
In any case, it is very convenient, practical and fashionable.
Leveling 1-800 on Legion recipes
Leveling Tailoring with Legion recipes requires level 100.
First, visit Tailoring Trainer Tanithria in Dalaran. Teleport to the city, talk to the guard and ask him to mark the location of the teacher.
After learning the skill, take the quest from Tanithria How it all began.
How to get recipes
Tailoring recipes can be purchased after completing quests given by the profession trainer Tanitria .
To upgrade the inscription according to this guide, you must get level 110 and complete all the tasks from the trainer.
In total, there are 38 new tasks for tailors in the game. All of them are quite simple, you can read the details on how to do it on Wowhead. Some of them are sent to the dungeons, but they can be completed in a few hours.
The most difficult task is the Path to Suramar (26th in a row). To complete, you need to collect 1000 units. Ancient Mana, however the default max mana is 300 and you will have to run through Suramar. During the main storyline, your maximum mana is increased by 400-500, and by an additional 500. upon reaching Honored with the Nightfallen.
The most important quest is The Loom of King's Grace (about 30th in a row). As a reward, you will receive recipes for Imbued Silkweave Bracers and Imbued Silkweave , and you can also buy recipes for other Imbued Silkweave items. They can be used for pumping at the level of 740-800.
Recipe levels
Most Legion recipes have three levels. The higher the level, the less materials are required to craft the item. In other words, using recipes of the third level is very profitable.
They can be purchased from merchants or faction quartermasters, received as rewards for completing world quests or winning on the battlefield, or obtained from monsters and bosses in dungeons.
If you hover over the star icons in the recipe bar, you will know where to get the next level recipe.
Access to World Quests
Most recipes for crafting silkweave items are rewarded by completing world quests. To access local quests, you must run Faction Alliance, by getting reputation with all Broken Isles factions to Friendly. This quest can be obtained from Archmage Khadgar
After gaining access to world quests, level your tailoring skill to 100 to complete professional world quests.
1 - 481
Learn one of the cloak crafting recipes from the trainer and craft 143 cloaks.
Do not throw away the fabric, you will need it later.
Note: Be sure to reach level 743. Otherwise, you will not be able to get multiple points for the following recipes. If your skill is not yet 734, craft some Silkweave bedspread .
743 - 782
At this point, you need to get the tier 2 and 3 recipes for one of the silkweave items.
13 x Imbued Silkweave Bracers Rank 3 - 715 x Imbued Silkweave
10 x Imbued Silkweave Gloves Rank 3 - 550 x Imbued Silkweave
Alternative recipes that use the Blood of Sargeras
For the options below, there is little to no difference between tier 2 and tier 3 recipes in terms of resources, but tier 3 recipes stay orange longer, i. With their help, you can download the skill to level 800.
10 x , level 3
10 x Imbued Silkweave Epaulets, Rank 3 - 60 x Imbued Silkweave, 20 Blood of Sargeras
10 x Imbued Silkweave Shoes, Rank 3 - 60 x Imbued Silkweave, 20 Blood of Sargeras
Sharp thorn of the forest spirit and runic fiber can be bought from Lala Lightweaver, who is next to the Tailoring trainer in Dalaran.
Recipes of the first level
- Pattern: Imbued Silkweave Sash is sold by Weaver-Enchantress Erenia in Val'shara.
- Pattern: Imbued Silkweave Epaulettes are sold by Arcanist Faxondius in Azsuna.
- Pattern: Imbued Silkweave Gloves is a quest reward from Exotic Textiles. The task can be taken from the Weaver-sorcerer Atistro.
- Pattern: Imbued Silkweave Slippers are sold by Arcanist Yaphisteia in Highmountain.
Level 2 recipes are sold by Lala Lightweaver in Dalaran. The exception is Pattern: A sturdy silkweave sash sold by Buckler in Dalaran Underbelly for 500 blind eyes. Methods for obtaining Blind Eyes are described
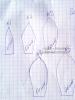
The set of patterns for a cape from a Pavloposad shawl includes (Fig. 1): patterns of “shelves” and “backs”, along which the neck and edge of the side are cut out, as well as a hood pattern.
Not only Pavloposad shawls are suitable for sewing, but also soft coat fabrics. Lining fabric is better to choose not from ordinary lining fabrics. Since the product will not have any fixation on the shoulders, it is better to take a non-slip fabric. For example, cotton material such as calico, baize or footer without fleece. Any soft and not too thick warming material is suitable as a heater. For example, batting or woolpon. A good option would be a heater that can be "put" in the product without lining. For example, fleece or footer with fleece. But the best option is a down scarf. You can use old scarves that have lost their appearance. They are easy to combine into one insulating pad. So, how much fabric do you need. You will need a Pavloposad scarf (a square cut or piece of fabric) measuring 148 by 148 cm. The consumption of lining fabric and insulation pad is 200 cm with a width of 140 cm, since you will have to cut out larger parts than a scarf. The consumption of a fleece footer with a width of 180 cm will be 180 cm. Cutting is performed on a scarf folded diagonally (Fig. 2). For the edge, it is better to use strips of fur on the braid. Approximate consumption, if you do not make rounding 68 - 68.5 cm.
You need to fold along the middle line of the pattern, facing inward, place the diagonal fold of the scarf parallel to the edge of the cutting table. Then, at the fold, you should find the center of the scarf and lay out the “shelves” and “backs” patterns on the scarf, taking into account the center point. The middle line of the "back" should coincide with the fold of the scarf (diagonal). Half skid (middle line of the shelf) - extended to the edge of the scarf. We do not add an allowance for the fastener - we will make hinged loops. That is, the sides will turn out end-to-end. The hood pattern fits into a lunge. If it doesn’t fit, move the “shelf-back” patterns a little from the center, but along the diagonal line, which in this layout replaces the shared one. The seam allowance for the hood is 1 cm along the seam and along the line of the face frame. No allowance is added along the stitching line. No allowance is added to the neck, both in the cape and in the hood. Do you need a shoulder tuck? A tuck is needed if you want to attach a shoulder pad. If the cape is without a shoulder pad, then the “shelves” and “back” patterns can be glued end-to-end along the shoulder seam and the already combined pattern can be used when cutting. We cut out the lining according to the details of the cut (Fig. 3), which have already been cut out - along the cape and hood.
The fabric is folded in half, facing inward, the edges are combined and placed parallel to the edge of the cutting table. We lay the cape on a lining with an indent from the cuts of 3 cm. A fragment that does not go wide can be covered with plastic wrap and circled, taking into account the double allowance for an additional stitch - 2 cm. If you have enough experience, then you don’t need to make a pattern. Please note that the neck also does not need to be cut yet. We also cut out the details of the lining for the hood according to the details of the cut, adding 1.5 - 2 cm to the existing allowances. Then, we sew the lining, iron the seam and you can cut the insulation. The insulating lining is cut out according to the details of the cut of the lining. You don't need to add allowances. Fragments of insulation, if it is made of batting or sherstepon, are best joined end-to-end with oblique stitches so as not to add thickening. Shared direction does not matter. If the lining and insulation are cut out of a footer or fleece, then you do not need to add “around” 3 cm, 1 cm is enough. one of them was not stretched or planted. We start by laying out the insulation of the cape and hood details on the table or on the floor and processing the pockets on the lining. See how to process the pockets on the lining. Then, we lay the carefully ironed parts of the lining on top and we baste the lining on the insulation with large (5-7 cm) oblique stitches or cleave with tailor's pins (Fig. 4). After that, it is desirable to quilt the lining, but very rarely, so as not to give it unnecessary rigidity, just a few lines (Fig. 4).
It is not necessary to quilt the details of the hood, since the line connecting the two halves will be enough. After grinding the hood lining, the insulation at the seams and at the tuck can be cut off, leaving a couple of millimeters, and the seam should be carefully ironed. Now you can cut out the neck with a tuck and on the “lining” according to the cape detail from the scarf. And, having processed the tuck, cut off the insulation and carefully iron it. Attach an epaulette shoulder pad to the “top” of the cape. By the way, it is better to make a shoulder pad from a padding polyester, it is not necessary to cover it with a cloth. You can also use ready-made foam blanks. Epaulette shoulder pad pattern:
The epaulette-type shoulder pad is used in raglan, shoulder strap-raglan, semi-raglan, shirt-cut products, as well as in products with one-piece sleeves. Stitching the hood is better with preliminary stitching. In this case, it is advisable not to forget the loop. When the hood is stitched in and the processing of the "lining" and "top" is completely finished, you can connect the "top" to the "lining" and cut off the excess. You need to connect first at the seams, and then with a machine stitch along the edge of the “top”, stepping back from the cut 0.5 - 0.7 cm. The cut should be edged with an oblique trim in the color of the scarf. At the final stage, we sew strips of fur on the braid and sew on hinged loops (look in specialized shops like “everything for sewing”) with buttons. Ready!
How many good things in the world happen by accident. For those who are not yet familiar with the new trend in the headwear line, this will be a pleasant discovery. This headpiece is essentially a hood. You will find out where it came from and you will be able to build a Wolka hood pattern yourself. If you don't like to wear knitted hats, , fur hats, but if you love hoods, then this accessory will undoubtedly appeal to you.
The founder of the Wolka brand and the inventor of this comfortable headdress of the same name, Ekaterina Volkova, is a famous Russian actress. So unexpectedly for herself, fate drew a sharp turn and made Ekaterina a designer and brand legislator.
So, in everyday life, creative ideas are born. I think that this idea occurred to many, but no one dared to implement it on a large scale. I am sure that many of you liked the Wolka headwear and you will want to have such an accessory in your wardrobe.
Of course, those who do not know how to sew can purchase a ready-made copy from a new brand in a branded bag. And those who have at least the slightest sewing skills can easily sew such a hood on their own. There is nothing difficult in this.
I have developed a pattern for a scarf - a Wolka hood and I am sharing it with you. I checked it, sent a sample, so you can safely use the pattern in your work. I liked Ekaterina's idea and in the near future I plan to sew this new fashion accessory for myself. If you know how this is done, then you can start the creation process now. The pattern is suitable for any size. But, if you wear a high hairstyle, then the length of the tails will have to be increased by about 4 - 5 cm.
All dimensions on the pattern are in centimeters. Seam allowances are not included.

Wolka has inner and outer sides, so there will be four side parts and two stripes. As you can see in the video, both sides of the hood are made of different materials. It depends on your desire. They may be different, or they may be the same. Double-sided Wolka has more uses.
I hope that the pattern will come in handy for you and you will create a warm comfortable headdress with your own hands that will serve you for more than one season. Wolka goes well with both outerwear from the autumn - winter wardrobe, and with. Such a universal hood is suitable for women, children and even men.
Sew with pleasure and delight yourself and loved ones with new outfits!
Find out even more interesting things:

Pattern of a terry dressing gown for a girl
Hello dear readers and readers! I know that among you there are many mothers who have small children or those who have not yet left ...

Denim jacket vest for girls
Greetings, dear craftswomen! We recently talked about women's vests. About the variety of materials used to create them and the variability of models. But they don't wear vests...

Cocktail dress with organza straps