Do-it-yourself postcard for a man for the new year. Do-it-yourself New Year's cards, photo ideas
It is customary to give postcards for all holidays marked and not marked on the calendar. This applies to large religious holidays such as Easter or personal and small ones such as the day of acquaintance or a big purchase. All memorable dates need postcards and the New Year is no exception. As you know, you can’t buy something made directly by human hands in a store and you won’t meet another one. Everything is unique.
We offer you to please and surprise your friends and acquaintances, colleagues and friends with New Year's cards. And to this on www.svoimi-rukamy.com we are attaching a selection of ideas for inspiration on the theme of New Year's cards.
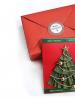
Idea number 1. Christmas card with a Christmas tree in a skirt
This is a large postcard. If you plan to write some kind of wish, and then print it on a printer, then this should be done before decorating.

So, what you need to create a card with a Christmas tree from corrugated paper:
2. Corrugated paper.
3. Scissors.
5. Double-sided tape and / or PVA glue.
6. Simple pencil.
Let's get started, do-it-yourself MK postcards from corrugated paper
Let's start by preparing the base for the postcard. To do this, take cardboard or thick paper, bend it in half. In principle, the standard move for a postcard. Next, on one of their halves, make a rough sketch of the future Christmas tree. This can be done with a couple of lines.
Now let's prepare the corrugated paper. You need to cut it into strips about one and a half centimeters high, and in length, curl this value because how fluffy the Christmas tree needs to be. We suggest taking a third of the planned length for allowance. The strips should be of different sizes to keep the triangular shape of the Christmas tree. That is, both the shortest and longest strips should be available.

Now you need to glue the strips of corrugated paper into place. It is better to start from the lower tiers and gradually rise up. Focusing on the marks made earlier and using glue or double-sided tape, glue the strips by slightly picking them up. To get a kind of skirt with tails.
When finished, you can decorate the top of your Christmas tree with a star and glue on glitter, rain, bows, or something like that.
You need to pick up some elements or come up with kind words. To make your postcard even more impressive for the addressee.
Idea number 2. New Year card and some scrapbooking
In this option, it is better to print out the wish in advance or print it on a separate piece of paper, which can also be beaten and presented in an original way.

So, what do you need to create a postcard with scrapbooking elements:
1. Thick colored cardboard or paper. A4 size will suffice.
2. Scissors.
4. Elements for decoration, at your discretion.
5. Scrap paper.
6. Any object shaped like a pencil.

Scarpbooking postcard, for beginners
Decide on the size of the future Christmas tree. And based on this, plan how much paper you need. More precisely, how many and what size do you need to cut rectangles from scrap paper.

Then, as you have decided on the number of rectangles and cut them out, you need to roll each one into cylinders. The basis of which will be a pencil or something cylindrical, which you have at hand. You need to twist the tubes in the direction of the width, and so that they keep their shape, after you remove the base, you need to fix the structure with glue.

After each rectangle is twisted into a tube, you need to connect all the tubes together with glue. Naturally, one should adhere to approximately the shape of a Christmas tree, that is, a triangle.

Now let's deal with the base of the postcard. Take the prepared sheet of cardboard or thick paper and bend it in half. Now you need to glue the Christmas tree on one of the halves. But before that, the glue on the Christmas tree should grab and dry enough.

After the Christmas tree is glued to the base of the card, it's time to decorate it. For this purpose, you can use all kinds of decorations - buttons, miniature bows, ribbons, beads, rivets, sequins, sequins, in a word, whatever your heart desires.

Decorations can be glued on double-sided tape.
Don't forget to write something nice to the addressee inside.
Idea number 3. New Year's card in the style of "children's hands"
This idea is perfect for little needleworkers and needlewomen. She is uncomplicated, but sweet and open, just like a baby soul. Let's not hesitate, call the kids and get started.

So, what you need to create a New Year's card in the style of "children's hands":
1. Colored cardboard. We suggest taking the classic combination of colors: red and green. But you are free to change them.
2. Sequins, rhinestones, sequins.
3. Wrapping paper or candy wrapper.
4. Black thin marker.
5. Scissors.
6. Double-sided tape and / or PVA glue.
7. Elements for decoration, at your discretion.
8. Stapler.
9. Hot glue.

Let's make a card with your child
Let's start by preparing the base for the postcard. To do this, take the red cardboard and simply bend it in half. You can cut off the corners of the resulting rectangle a little. This will make your message more interesting.

We make a Christmas tree. You will need to take green cardboard, and bending it in half, then cut it. From one half, bend the "accordion". Determine the width of the "step" yourself. We recommend at least one centimeter and no more than three. Grab one of the ends of the "accordion" with a stapler, you can apply two staples for reliability.

Now let's make a stump. To do this, cut out a simple rectangle from wrapping paper or candy wrapper. If you use the latter, then do not forget to first iron it through a plain piece of paper. This will help straighten the wrapper.
Now you need to glue the Christmas tree to the base of the card. Hot glue is perfect for this purpose. It is better not to trust this operation to children. Under the free end of the Christmas tree, fill the stumps and glue it too.

Advice. Since the thermal gun heats the rod to a sufficiently high temperature, the child can get burned or ruin the whole work with an inaccurate movement, it will be a shame.
It's time to decorate the Christmas tree. Glue the decorations you prepared on the crown. Don't forget to put something big and pretty on top of your New Year's beauty.
Give your child a marker and let him write some simple and kind words on a postcard and let him make a couple of mistakes, where would he be without them?
Idea number 4. New Year's card in the style of "minimalism"
We offer you a postcard with a Christmas tree in a minimalist style for consideration and inspiration. At first glance, a simple and even modest postcard becomes quite complex upon closer examination. But you're not looking for easy ways, are you?

So, what do you need to create a minimalist greeting card?
1. Thick colored cardboard or paper. A4 size will suffice.
2. Stationery knife or shaped hole punch.
3. Thread with a needle. It is better to take the color of the thread in contrast to the main color of the postcard. And the type of thread can be taken similar to "iris".
4. Pencil and ruler.
5. Sequins.
6. Scissors.
New Year's card for children with their own hands
Let's start, as they say, from the beginning. Fold the cardboard sheet in half. Now on one of the parts we need to make some sketches. This applies to the location of the top of the Christmas tree and the Christmas tree itself. The field of how you conditionally placed the Christmas tree on the half of the postcard. Carefully cut through the top of the tree. If you have a shaped hole punch, then this task will not take you much time. Well, if there is no hole punch, then first draw a star, then carefully cut it out with a clerical knife. By the way, before starting work, it is better to update the tip of the blade.

After you are done with the star. Take a thread with a needle and, guided by your marks, start making stitches. Remember to string enough sequins onto the thread after piercing the paper. It is not desirable to pull the thread strongly and it is also not desirable that it sag.

Now you need to make notes through the cut out hole of the sprocket. So that its location can be seen inside the postcard. Use a sticker in the form of an asterisk and any other, not necessarily of this form, the main thing is that it is not clear what kind of sticker it is when the card is closed.

It was just that a shining surface or something like that could be seen through the hole in the star.
That's all. Write something good inside and feel free to give!
Idea number 5. Postcard with a Christmas tree in origami technique.
Origami is a very complex and interesting technique. Her Asian roots give her a certain charm and mystery. At the mention of this technique, complex structures and intricate schemes immediately pop up in memory. But do not worry, the Christmas tree proposed below is not an aerobatics figure. You will definitely deal with it.

So, what do you need to create a card with an origami Christmas tree:
1. Colored thick paper, but not cardboard.
2. Colored cardboard.
3. Double-sided tape and / or PVA glue.
4. Elements for decoration, at your discretion.
Postcards for children for the new year, simple MK
Let's start with the base of the postcard. Gently fold a sheet of multi-colored A4 cardboard (you can also use another one) in half.

Tip: Be aware that some cardboard sheets tend to crack when bent. This greatly affects the aesthetics of the postcard itself. If you have the trouble of running into such cardboard, then the bend can be decorated with figuratively cut colored paper or ribbon, or even braid.

So, now you need to fold about three origami modules. Depending on the original size, you can make more or less modules. Accordingly, the Christmas tree will be larger or smaller.
Let's start from an example. Take three squares of construction paper or scrapbooking paper. You can print any image you want on thick paper. The sides of the square, as we said above, can affect the size of the Christmas tree. In our case, 20 centimeters. The square needs to be folded diagonally, then expanded and bent again diagonally, crosswise.

You conditionally noted four triangles, now you need to fill two opposite each other inward. Now press the resulting triangle to any surface and, having marked for yourself the conditional center of the figure, bend the lower corner parallel to the marked middle. Repeat the procedure with the second corner. The module is ready. Add two more. You can take a different color paper.

Let's start assembling the Christmas tree. Glue the origami module onto the base of the postcard. You can use glue or tape. The formation of the Christmas tree must be done from top to bottom, as if putting the next module into the previous one.

The next step is to fill in the details of your postcard. Choose how and what to decorate yourself. As an example, we offer bows and buttons.
Idea number 6. Postcard with ribbon - herringbone
This idea is also minimalist. And it is not overly complex. If you are looking for ideas to work with kids, then this idea is perfect for you.
So, what do you need to create a card with a ribbon Christmas tree:
1. Thick colored cardboard or paper. A4 size will suffice.
2. Scissors.
3. Double-sided tape and / or PVA glue.
4. Elements for decoration, at your discretion.
5. Decorative ribbons, scrap paper or clippings from bright printed pages.
6. Stickers. In this option, it is important to take stickers in the form of stars.

Let's start making a simple postcard
Let's start, respectively, with the preparation of the foundation. To do this, bend a sheet of cardboard in half. Among the prepared materials, look for paper or tape that is closest in color to brown. We will decorate the trunk of the Christmas tree. The ideal option would be to cut a very elongated trapezoid out of brown paper. Glue the Christmas tree trunk onto one of the halves of the base. Try to place it exclusively in the middle of the sheet.

After you have completed work with the trunk, you need to pay attention to the crown of the tree. Namely, cutting the prepared material into strips. Each next strip should be longer or, accordingly, shorter than the previous one. It is better not to change the width. We suggest cutting strips of approximately 1.5-2 centimeters.
Now that you have visualized how many strips you need, you need to cut off the corners of the cut ribbons at an angle of about 45 degrees. So that, in general, the tapes already placed in their proper places are a triangle with a very pointed apex. It is better to do this not for each tape separately, but for all at once, with one, so to speak, notch.
Now you need to glue the tapes to the places provided for them. Ribbons should overlap the trunk. The process is best done from the bottom up.

Glue a star-shaped sticker to the very top of your Christmas tree. On this we can consider the work on this postcard completed. But you can add details with decorative elements. It's up to your taste.
Idea number 7. Christmas card with original Christmas tree
And one more idea for inspiration for a variation of the New Year. The idea also does not differ in multi-step and high cost of materials. And at the exit, the original and cute decorations of the New Year's card. If you take pastel or, as makeup artists like to say, nude shades, then the card will have a fairly bright female character. Such a card would be an appropriate addition to a gift for a woman of middle age and older.
So, what do you need to create a greeting card with an original Christmas tree:
1. Thick colored cardboard or paper. A4 size will suffice.
2. Scissors.
3. Double-sided tape and / or PVA glue.
4. Elements for decoration, at your discretion.
5. Round napkins or double-sided colored paper.
Original postcard with a Christmas tree with your own hands
The first thing we do is smooth across the cardboard. Here is the main part of the postcard ready.

Now let's make a Christmas tree. For this purpose, you need to take a double-sided napkin in the shape of a circle and divide it exactly in half. In the future, you will need only one part to create one Christmas tree. Well, if you could not find suitable napkins, then you can make paper for this purpose yourself. The main thing is to decide what size your Christmas tree seems to you.
Since it must be borne in mind that the average printer is able to print any picture only on A4 format. Accordingly, based on this, it is necessary to calculate the size of the future Christmas tree. Alternatively, you can use thick double-sided paper.
In favor of the printed option: if you print only a semicircle, the size of the Christmas tree will increase to 20-25 centimeters.

So, you have decided on the paper and in front of you lies a semicircle. In order to fold the Christmas tree, you need to do a fairly simple operation. Step back about 3-5 centimeters along the even edge of the semicircle and make an inconspicuous mark for yourself. This is where the top of your Christmas tree will be located. Now "accordion" smooth the paper. Step width is about five centimeters. Experiment with it. You may be satisfied with other options.

It makes sense to fix the resulting folds so that the Christmas tree does not strive to free itself like a spring. This can easily be done with double sided tape. When your hand becomes more confident in folding the accordion, you can pre-fix the tape on a semicircle of paper.
Now you need to glue the Christmas tree on one of the halves of the next postcard. This can be done with tape or glue.
Optionally, add details to the card, decorate the Christmas tree with decorative elements.
Idea number 8. New Year cards with a 3D effect
We have all been familiar with children's books since childhood. Which, without knowing it yet, were the founders of modern trendy 3D. Turning over the next sheet, we met with foxes, wolves or Koloboks, which, as if alive, rose above the book pages. Agree, then for us it was almost magic. We have grown up, and now we can try on the mantle of a wizard simply by making voluminous postcards for the New Year.
So, what you need to create a New Year's card with a 3D effect:
1. Thick colored cardboard or paper. A4 size will suffice.
2. Scissors.
3. Curly scissors (optional).
4. Pencil and ruler.
5. Stationery knife.
6. Elements for decoration, at your discretion.
Let's start making 3D cards for the New Year
From colored cardboard, you need to cut out several triangles; for this purpose, take curly scissors. In the future, these triangles will become the crowns of trees. It is not necessary to make them the same, you can experiment with the sizes.

Now let's get down to preparing the base of the postcard. For this purpose, you need to take two sheets of cardboard and paper. Cardboard will play the role of the base, and paper will be the inside of the postcard. And bend them in half
A sheet of paper that will play the role of an inner liner must first be drawn, and then cut with a clerical knife or scissors. The marks are applied perpendicular to the fold of the paper and are something like steps, namely stumps for poor Christmas trees.

The crowns of Christmas trees prepared in advance now need to be glued into place. To do this, open the inner insert of the postcard, you should get something like steps, and stick Christmas trees on them. Have you already understood the principle of the postcard?

Now you need to fix the inner insert of the postcard with glue in a sheet of cardboard folded in half.

Christmas trees glued inside the cards can be decorated with flat decorations made from the same paper.
That's all. Postcard with 3D effect is ready.
Idea No. 9. New Year dynamic card
We invite you to familiarize yourself with the idea for creating a very original greeting and not only a New Year's card. But still, it will look like the usual sheets folded in half. However, here is a completely different principle. But the recipient will definitely like it.

So, what do you need to create a dynamic New Year's greeting card:
1. Thick colored cardboard or / and paper. A4 size will suffice.
2. Scissors.
3. Stationery knife.
4. Compass.
5. Thick enough thread.
Let's start making a dynamic postcard
On a standard sheet of A4 paper, draw a circle using a compass. Then cut it out. Now fold the resulting circle in half and with the help of scissors make cuts that are arranged in turn and reflect the contours of the circle. As you move away from the center, the incisions should become longer.

After that, you need to straighten the circle. Glue a thread to the center of the circle. To make the product more interesting. The thread is threaded through the top and circles of cardboard of a contrasting color are glued to it. The thread is positioned so that the glued circles are located under the base of the circle. Now, if you pull the string, the design will turn into an unusual garland shaped like a Christmas tree. And inside it will playfully see bright circles.

Now you need to glue the Christmas tree after returning it to the folded state. When gluing, make sure that you do not glue too much, and the Christmas tree has the opportunity to unravel. The base to which you will glue your dynamic Christmas tree can be made from cardboard folded in half.
That's basically it. You have got an unusual and dynamic postcard, it remains to write congratulations and give them.
Idea number 10. New Year's cards, decorated with double-sided tape with a backing
We offer you several options at once under one heading. Since they have a common element, all variants use double-sided adhesive tape with a backing as a basis for decorating and fixing elements.
So, what do you need to create a New Year's greeting card using double-sided tape:
Option 1. First you need to prepare the basics for postcards. This is very easy to do - you just need to take a few sheets of cardboard and bend them in half. You can make not only rectangular shapes, but the simplest and most familiar just like that. Triangular or cardboard ones will also be quite original, just keep in mind that not all decorative elements look equally good, for example, on a round shape.
Video, DIY New Year cards
Then we will prepare the elements for decoration. From colored paper, cut out many circles from colored cardboard using a shaped hole punch. It is desirable that the size is different. Well, if there was no hole punch on the farm, you can simply cut everything out with scissors. True, this will take more time, but we are not looking for easy ways, are we? It is better to take paper that is hard and different in color. The ideal option would be to use colors that are several tones different, but within the same shade. You can take paper imitating a mirror surface and introduce it as an addition.

Now you need to take the prepared base of the postcard and stick adhesive tape on it. By creating a semblance of a circle on the sheet. Then remove the protective layer from the scotch pads and glue multi-colored circles. Repeat this process as you add more layers. Try to alternate circles of different sizes. The number of layers is up to you. Add them until you get the desired result. Then simply tie a colorful ribbon with a bow and glue it at the top, making the mugs glued in layers into a kind of wreath.
Option 2. Quite a minimalist option. Good for men or guys. You will need a prepared postcard base, on which you will stick a piece of adhesive tape, and on it a square of plain cardboard. Decide on the size yourself. Place a slightly colorful ribbon bow at the top of the cardboard square. It will turn out some kind of stylization of the image of the gift.

Option 3. Cut out several rectangles of various shapes from colored cardboard. They must be wrapped with a thread in the manner of wrapping gifts with ribbon and leaving a bow on top. Then glue the postcards in a row along the bottom edge of the blank on the double-sided cattle. You can succinctly add "Happy New Year!"
Simple New Year's cards with your own hands. Ideas for creativity
Idea number 11. New Year's greeting cards decorated with a sewing machine stitch
This is an extremely interesting idea. Because even the thought of stapling paper is already surprising. This idea is based on an appliqué that is fixed in place with a machine stitch. Naturally, the line can also be applied manually, and you can find a certain charm and originality in this. Both options should be tried, as different stitching techniques can give a completely different look to the postcard.

So, what do you need to create a New Year's card decorated with a sewing machine line:
1. Sewing machine. In principle, you can make stitches by hand.
2. Thick colored cardboard or paper. A4 size will suffice.
3. Scissors.
4. Additional decorations at your discretion.
Let's get started.
Now cut out decorative elements from any type and coloring paper. It can be Christmas trees, balls, stars. And the paper can be plain or colorful, monochrome. Wrapping, for scrapbooking, simple, printed on a printer or colorful pages of old magazines. Then fold all the elements on top of each other and sew with a typewriter. Try to fix all the layers with one line. Take a bright thread so that it can be clearly seen against the general background. Set the thread tension to the lowest setting.
You can have one element or make many layers. Experiment to your heart's content. The line can be succinctly arranged or made many by crossing them.
Video, Do-it-yourself greeting cards for the New Year and Christmas
Here is a selection of ideas we got this time. We hope that you have found something for yourself among the proposed ideas. Give more cards and gifts, fill them with warm wishes and kind words. Happy New Year!
New Year is a time of pleasant surprises, gifts and magic. Classical offerings to a man in the form of socks and perfume today cause more surprise than sincere joy. Therefore, a woman has to be more selective when choosing a present, especially if it is intended for a loved one. How to combine beauty, usefulness and originality in one thing? What can I give a guy (ideas)? A gift with your own hands, whether it is a purse sewn from leather or a craft made from photographs, will be a sincere, valuable surprise for any representative of the strong half of humanity! There are actually a lot of ideas. So we choose
Donate clothes
If you knit well, then the original one with your own hands will pleasantly surprise your chosen one. If the skill is not enough for complex patterns, the partner is too picky in choosing clothes, or you do not know his size, you can opt for a warm soft scarf or mittens with a simple pattern. Also, an original New Year's gift for a guy with his own hands - warm hand-knitted woolen socks with an interesting ornament, warming on cold winter evenings.
Use photos
Surely a lot of joint pictures have accumulated in your phone or computer. Create a collage in a large frame or a handmade album with dates and your comments. There is always a place for such a gift, and it will also be a wonderful reminder of the time spent together.
If there are not many photos, but there is one that both of you like, you can immortalize it on a mug, pillow or T-shirt for your loved one (provided that he wears it).
If you are just starting a relationship and have not yet acquired a joint album, what to give a guy for the New Year? You can give your beloved guy a certificate for professional shooting with your own hand or ask your friends to take a picture of you.

Handmade accessories and leather crafts
Any man uses a wallet, purse, business card holder, phone or tablet case, or some other accessories. Swap them out for ones you've made of fabric, leather, or other material, embroidered with your loved one's initials or a little message. from an apartment or a car in the form of a woven house, a car, a toy, a heart or any other figure of your choice - an original gift for a guy with your own hands. In addition, he will always be at hand.

If a man wears a watch on a strap or bracelets, you can make something similar out of leather. Such a gift will look expensive, stylish and solid.
Mugs
Universal? Yes, a mug is useful to any man. Faceless? Perhaps yes. To avoid this, make it addressable. Now there are many companies that offer to apply an image to any surface, including glass and ceramics. Print your general photo on the cup or, even better, sign it with indelible markers on ceramics, draw your portrait, even if it turns out to be a caricature, something on the New Year theme, write a couple of warm words to your loved one or a funny wish! If you do not have artistic talents, you can even draw a funny mustache. This, on the one hand, is simple, on the other hand, an original do-it-yourself gift for a guy will be an unusual alternative to a holiday card and will certainly bring a smile.

Food as a gift
As the well-known wisdom says, a man's love is won through his stomach. Therefore, what is not an option to feed your loved one with delicious food? Wake him up with a fragrant cup of coffee and breakfast or organize a romantic New Year's Eve. Decorate dishes with hearts made from vegetables and fruits. Show your talent as a hostess.
If your favorite is a sweet tooth, then why not a gift for a guy with gingerbread men and New Year-themed cookies? Or a beautiful birthday cake?

Fancy baskets
If it so happened that there is no time to make a gift for the New Year to a guy with your own hands, or you are not confident in your abilities, do not despair. Think about what your lover loves the most. Collect a basket of things dear to his heart. For example, if he is a football fan, then put a couple of bottles of beer, crackers and a scarf of your favorite football team as a gift, it will be pleasant and unexpected. In addition, this way you can show a man that you know his interests, passions and support them.
Children's motives
If you are a married couple with children, then it's time to involve the children in making a creative New Year's gift for dad. It can be a drawing of your family, decorated in a stylish frame, painted mugs, handprints and footprints on various surfaces from paper to fabric on a T-shirt. The main thing is to choose the right paint.

Handmade cards and gift wrapping
Beautifully presenting a gift to a guy with your own hands is half the battle. Therefore, it is important not only to choose the thing that your chosen one will like, but also to design its packaging in an original way, then even the simplest gift will look spectacular. For men, packaging in the form of a shirt and tie, suspenders and other painted or glued details is suitable. And a paper origami card with such a pattern will perfectly complement a New Year's gift for a guy with your own hands.

Handmade additions to the gift
Some couples agree in advance on what they will give each other. This is practical, but at the same time eliminates the magic of surprise and obscurity. Therefore, you can always complement the main gift with a cute handmade trinket. For example, a guy is fond of photography, give him a camera and a handmade case for her. Or he asked me to buy car covers for him, and you will add them with a cute homemade keychain. If this is something from mobile gadgets (phone or tablet), sew an original case with the initials of your beloved, etc. So you show that you spent the time and effort to create a gift, which means you made it with a soul.

Of course, you can come up with even more ideas of what to give a guy for the New Year. You can present your beloved guy with handmade toys, DIY crafts, hand-sewn pillows and much more. The main thing to remember is that any, even the simplest gift will be original if you make it targeted. If these are socks, then let them be knitted by you, with a fun pattern, even if your knitting skills are far from professional. If this is a mug, let it be painted and personally signed by you with warm congratulations for your loved one. With a little imagination and a sense of humor, you can get the perfect New Year's gift for a guy with your own hands, which will last for many years.
No matter how good a gift is, it is considered incomplete without a postcard. The range of greeting cards today is very large. However, if you want a unique unique postcard, then it is better to make it yourself with your own hands. This is exactly what we will do now: consider the ideas of greeting cards for the New Year with our own hands.
You will need: A4 thick colored cardboard, scissors, corrugated paper, PVA glue or double-sided tape, a simple pencil, decoration elements (sequins, beads, ribbons ...).
Master Class

New Year card in scrapbooking style
scrapbooking- this is a whole art that teaches how to create and decorate photo albums with your own hands (in our case, a postcard). Scrapbooking has a whole story of how a notebook turned into an album. At the end of the 17th century, notebooks appeared with additional blank pages. Their owners pasted images, creating entire collections. This is how scrapbooking began.
You will need: thick colored A4 cardboard, PVA glue or double-sided tape, scissors, scrap paper, pencil, decoration elements (sequins, beads, rain, buttons, sequins ...).
Master Class
- Make 12 scrap paper rectangles. The size of each rectangle should be different, starting with the smallest and ending with the largest. (Width from 1 to 12 cm, length 5 cm for all rectangles).

- Roll each rectangle into a cylinder in the width direction, using a simple pencil to secure each cylinder with glue.
- Glue all the tubes together, starting with the largest and ending with the smallest, creating a Christmas tree shape.

- Let the Christmas tree dry well, then glue it on the right half of the card.

- Decorate the postcard to your taste with sequins, sequins, buttons, rhinestones ...
You will need: A4 color cardboard, wrapping paper or candy wrapper, thin black marker, scissors, PVA glue or hot melt adhesive, stapler, decoration elements (sequins, beads, rain, buttons, sequins, bows ...).
Master Class

New Year's card in the style of minimalism
Minimalism(from Latin - the smallest) - this is a style that is distinguished by simplicity and brevity of composition.
You will need: A4 color cardboard, a shaped hole punch or a stationery knife, thread, needle, sequins, a simple pencil, a ruler and scissors.
Master Class
- Make the base of the card by folding a sheet of cardboard in half.
- On the right half of the card, sketch out the Christmas tree and star tops. Use a ruler and pencil.
- Cut through the star with a shaped hole punch or a clerical knife.
- Make holes in the shape of a Christmas tree with a needle - a triangle.
- Take a thread with a needle and make stitches. String sequins after each stitch.
- Carefully fasten the thread from the back.
New Year card in origami style
Origami- This is a type of arts and crafts, literally translated from Japanese as "folded paper" into various figures.
You will need: multi-colored A4 cardboard, PVA glue, scrapbooking paper or thick paper, decoration elements (sequins, beads, rain, buttons, sequins, bows ...).
Master Class
- Make the base of the card by folding a sheet of cardboard in half.
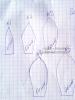
- Take 3 squares of thick paper with sides of 20 cm.
- Fold the square diagonally, unfold and again fold diagonally across. (Conditionally marking 4 triangles).

- Fill 2 opposite triangles inward.
- Press the resulting triangle to the surface and conditionally mark the center.
- Bend the bottom corner parallel to the middle. Repeat this procedure with the second corner. The module is ready!

- Make 2 more of these modules, you can have different colors.
- Assemble the Christmas tree in this way: glue the origami module on the right side of the postcard, form the Christmas tree from top to bottom, put the next module into the previous one.

- Decorate the Christmas tree to your taste with sequins, sequins, buttons, rhinestones ...
You will need: A4 color cardboard, scissors, a simple pencil, ribbons, PVA glue, decoration elements (sequins, beads, rain, buttons, sequins, bows ...).
Master Class
- Make the base of the card by folding a sheet of cardboard in half.
- Glue the tree trunk to the right side of the card in the center. The barrel should be made of brown ribbon in the shape of a trapezoid length.
- Cut 6 strips of ribbons 2 cm wide, 2, 4,6,8,10,12 cm long.
- Trim the corners of the ribbons on both sides.
- Glue the tapes from the bottom up, in the shape of a triangle.
- Decorate the Christmas tree to your taste with sequins, sequins, buttons, rhinestones, an asterisk, bows ...
You will need: A4 color cardboard, scissors, a double-sided round napkin, a ruler, a simple pencil, double-sided tape, decoration elements (sequins, beads, an asterisk, rain, buttons, sequins, bows ...).
Master Class

You will need: A4 color cardboard, A4 color paper, scissors, a ruler, a simple pencil, a stationery knife, flat paper decorations (snowflakes, stars ...), decoration elements (sequins, beads, an asterisk, rain, buttons, sequins, bows ...).
Master Class

You will need: colored cardboard and A4 paper, scissors, stationery knife, compasses, thick thread.
Master Class

Romantic, love cards are always the presence of hearts and love confessions on the cards. Such cards are given with or without occasion: for Valentine's Day, birthday, anniversary of the relationship, on the occasion of reconciliation, as a token of gratitude, etc.
 The news portal "site" on the eve of the celebration of Valentine's Day, has prepared for you an excellent selection of postcards for your loved ones, which you can easily make with your own hands in a matter of minutes.
 DIY postcards
Postcards to your beloved
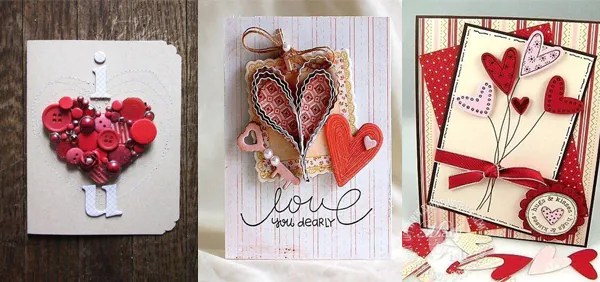
Do-it-yourself postcard with a voluminous heart
 Such a luxurious voluminous heart will be a wonderful touching decoration for your homemade postcard. It's very easy to do. For manufacturing, you will need: colored paper, a sheet of thick colored paper (it is preferable to choose red or its shades) for the base of the postcard, PVA glue and scissors.
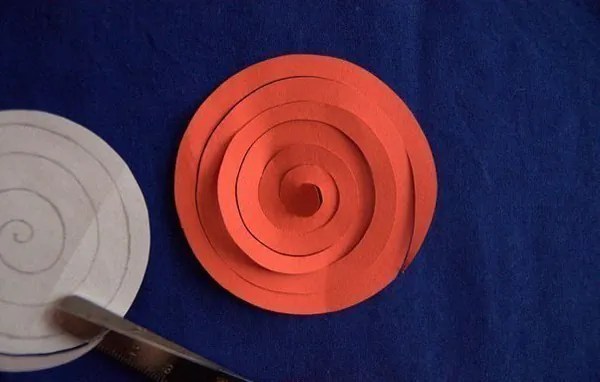
 From colored paper, cut out a large number of multi-colored circles. Try to choose paper colors of the same color, but different shades.
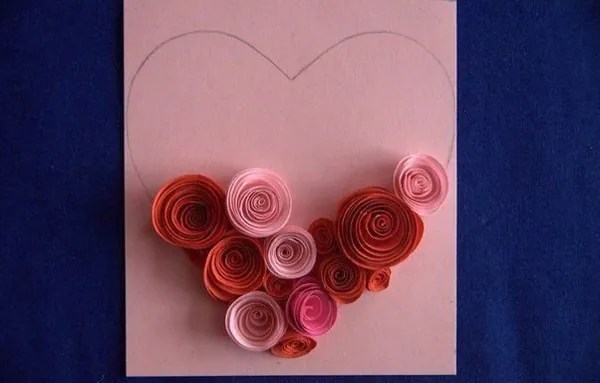 Then, using a pencil, draw a neat spiral on each circle and cut it out. Then form a small rose from the finished paper spiral, fix it with PVA glue. From the resulting large variety of paper roses, form a voluminous heart on the front side of a greeting romantic homemade card. Glue roses with PVA glue or double-sided tape.
Postcard tree of love do it yourself
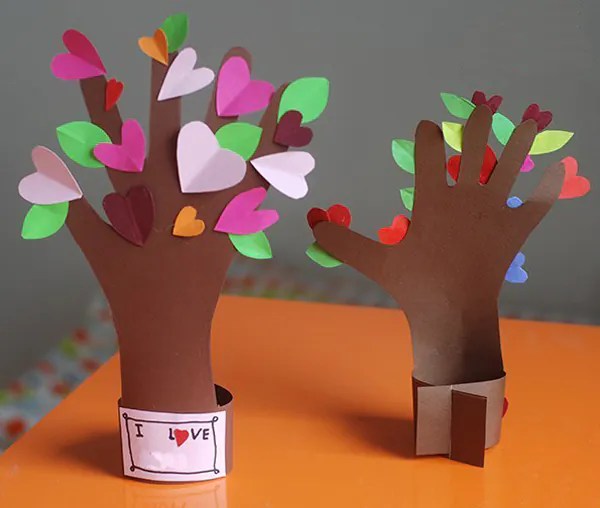 A very cute and bright postcard that you can easily make with your own hands from colored paper.

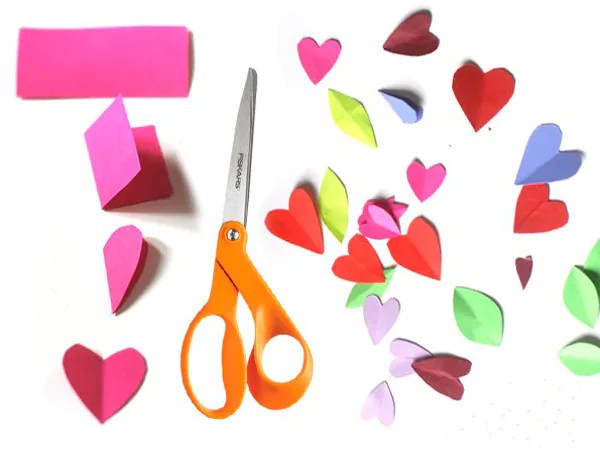 Trace your palm on colored brown paper. Cut it out carefully. You should have a small tree with a trunk and branches. Since it is frosty February outside the window, and you want the speedy approach of spring and warm sunshine, decorate the tree with multi-colored hearts.
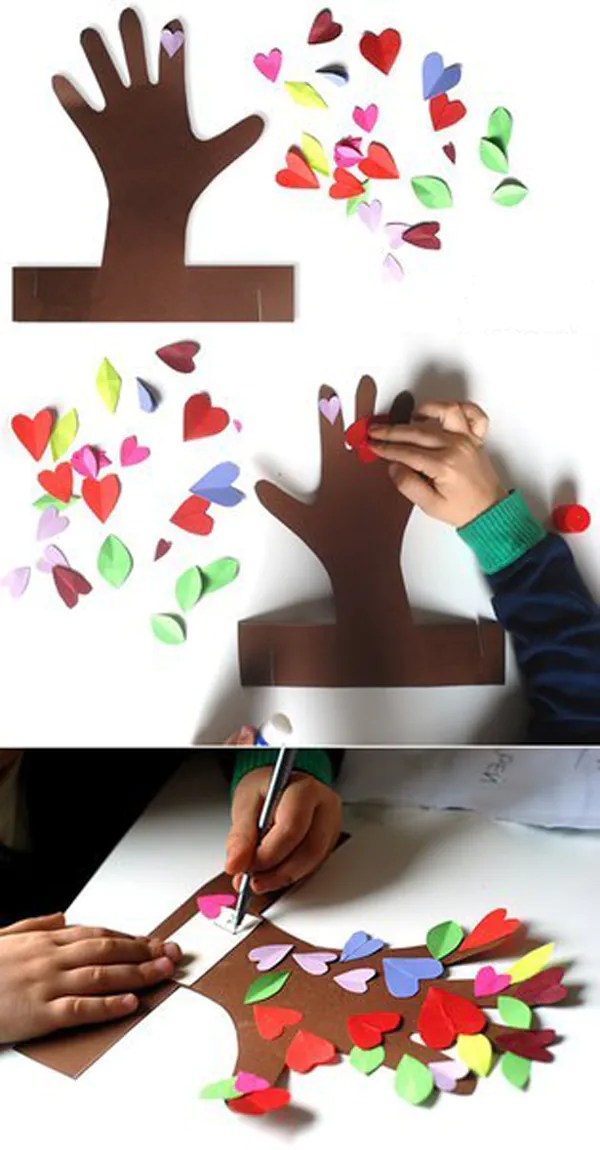

 On each heart, you can write declarations of love, make compliments or write to your lover why you love him.
Postcard to a loved one with a heart
 Unusual, but very easy to make postcard. Cut out strips of the same width but different lengths from decorative paper (see template).


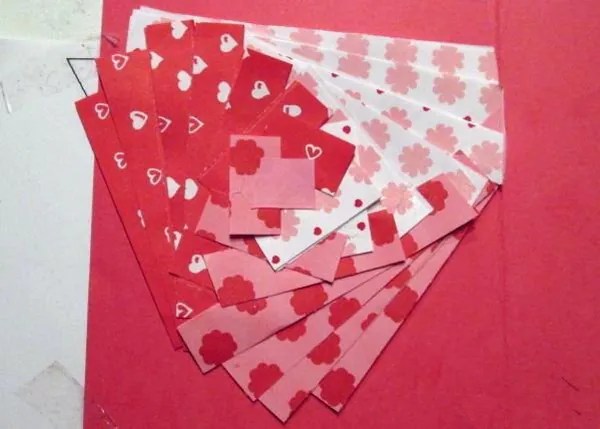 Glue pieces of decorative paper in the shape of a template and glue it inside the card. On the front of the card, cut out a neat big heart.
DIY 3D heart card
 This version of a romantic card for a loved one is for the most patient and careful people in love.


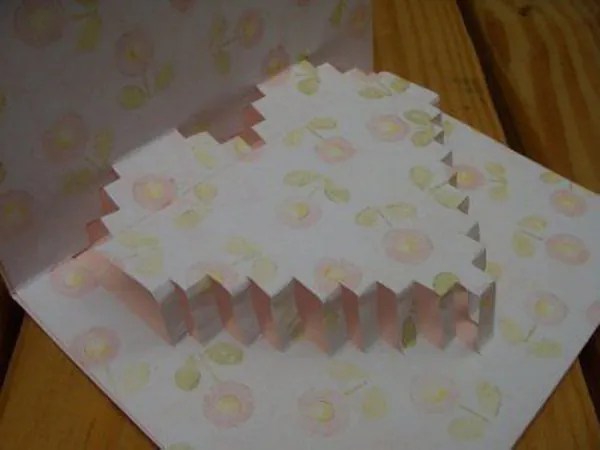 Accuracy and impeccable accuracy are very important in the manufacture of this postcard.
The news portal "site" wishes you to love, be loved and try to make each other's life much brighter and warmer.
A card for the person you are dating or married to is a great gift that reflects your best feelings for him. And in order to convey these feelings in the best possible way, such an item in the form of a gift for a relationship or wedding anniversary, for a birthday or for another holiday must be created by oneself.
Card on the day of the anniversary of the relationship or wedding
If you are already celebrating the holidays with your loved ones in the form of a wedding or relationship anniversary, you probably have a lot of photos that capture the most beautiful moments that cause a storm of positive emotions. All of these photo cards can be used to create an incredibly romantic postcard.

The first thing you need is double-sided cardboard. Its color should be determined by you, but it will be better to choose something bright or light. It should be bent in half so that the shape of a book is obtained.
The next step is decorating with photos suitable for a relationship or wedding anniversary. In order not to spoil the finished photographs, it is better to print new ones. An important condition is that your images must be small so that they can fit on cardboard. It is not necessary to try to cut out your images without a background, because without it they may look inharmonious.

Before pasting the cover of the photo, you need to write in the middle something like the sentence “Happy day, my love!”, And then place the photo around the inscription. Next, write some congratulatory text on the first page. On the second page we attach a photo with your image cut out in the shape of a heart.

If it seems to you that there are too many gaps left, you can fill them in with hearts of different colors from colored paper. And now, a gift for the anniversary of the wedding or relationship is ready!

Birthday card for my love
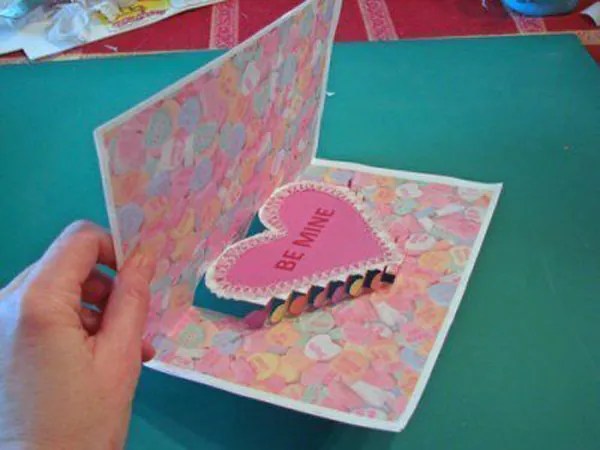
Do-it-yourself postcard-certificate is an interesting option. A loved one is unlikely to be delighted with such a gift!
The basis will be double-sided cardboard, which should be folded in the form of a book. Its color is your choice. On the cover you need to place multi-colored envelopes under the numbers. A convenient option is to make nine envelopes three in a row.

Making envelopes is simple - we take a small rectangular leaf, put it in a vertical position and make three folds dividing it into three equal parts. We bend the lower part inward and glue it on the sides to the middle one. We bend the upper part down and make a triangle out of it with scissors so that the fold line is the base. We attach the resulting envelope.

In the envelopes you need to put hearts denoting certificates. On the first page we write a congratulation, and on the second we indicate the purpose of the certificates by numbers. For example, certificate number 1 is a kiss, certificate number 2 is the preparation of a delicious preferred dish.

Universal voluminous card for a guy
Such a voluminous postcard can be presented to a guy for his birthday, and for any other holiday.

We take the cardboard in size A4, fold it in half. It is advisable to choose not dark and not red.
On the cover, you can depict you and your dear person from various details. Clothes are made from multi-colored pieces of fabric, arms, hair and legs can be created from woolen threads, and other parts of the body are easily made from paper. A suitable background is a huge heart. Do not forget to write something like the phrase "Happy Birthday, dear!" above.

From red paper, you need to cut out a heart that fits inside the postcard, draw a face on it and glue pens to it. The palms need to be glued to the inside. Volumetric postcard is ready!
Postcards in the form shirts with a tie
A huge advantage of these cute men's paper shirts is versatility. They do not carry intimate, romantic and other specific hints, therefore they can be used as a present for a birthday or other celebration for a variety of men around you. Such an item will please both a brother, and a loved one, and a friend.
The material for the base of the shirt is ordinary thick paper. The use of thin cardboard is also possible. The choice of material color is up to you.
If you used an A4 sheet, fold it in half crosswise and place it in front of you in the form of a book. Place a ruler vertically at the top edge and measure about five centimeters. Then, attach a ruler vertically to this point and draw a straight line with a pencil.

The resulting thick strip must be cut off, but only so that it remains on half of the entire sheet. The cover of the postcard should be five centimeters higher than its last page. Next, you need to make two small cuts on the cover, as if we want to cut off another thick strip. We fold the incised edges inward, forming a shirt collar.
The next step is a tie. It can be made from paper or fabric in a color that contrasts with the shirt. We draw, cut it out and glue it to paper. Tip: first you need to make a square (the base of the tie), and then its main shape.
If the card is not intended for a too serious man, feel free to use bright colors and various decor. Flowers on a tie, a pocket with a handkerchief, buttons - choose the best decor option with your own hands!
Postcards for fisherman do it yourself
A man who is a fisherman can be presented with a hand-made postcard with fish on the day of the fisherman or on his birthday. For the base, you need double-sided cardboard of any color, which should be bent with a book. On the top of the cover and inside we write congratulations on your birthday and wishes.

We cut out a rectangle or other figure that imitates water from blue or blue paper and glue it to the cover. We draw fish on colored paper, cut it out and glue it to the “water”. Fish can be made not only from paper, but also from fabric or draw with colored pens. In addition to fish, it is recommended to make algae, shells and sand.
The next step is to create a grid with your own hands. It will require ropes or thick threads. You need to cut and connect the strings so that they form a fishing net, and then glue them and attach them to the "water".
Fishing rods can be attached to any part of the cover. Their basis will be ordinary toothpicks with thick threads at the tip. We wrap them with thin ribbons or draw stripes on them.
The last step is decorating with your own hands. This will require paper or woven fish. They can be placed both on the inscription "Happy Birthday", and near the congratulatory text, and in free areas.