Plastic container icon. What can be done from a canister with your own hands Decor of a plastic box
Today, plastic containers are produced in almost any shape and size. And although it is very convenient to use them for storing things, in terms of design, they are far from always ideal. Therefore, boxes and trays have to be hidden, closed in cabinets, cleaned under beds or placed in basements and attics.
But you can apply one of 13 original solutions that will help fit the containers into the interior of any room. Now you can place all your things in them, giving up unnecessary furniture.
1. Vertical storage
Baking trays and pans take up a lot of space in the kitchen if you're used to putting them in the same position as when you cook. You can put one baking sheet on top of another and place in the oven. But in this case, to get the right one, you have to lift the rest. And every time before cooking, the oven needs to be emptied ... A more convenient option is to store such dishes vertically, using a tall container for this. Now you just need to select the desired shape ...
2. Fits into any interior
Plastic on its own can look a bit cheap in a bedroom or living room. So if you want to organize a beautiful storage space that will go with furniture and accessories, just add a few details... Tape the sides of the container with the same textiles that are used for blankets, curtains or pillows. Transparent plastic will look better if you paint it with acrylic spray paint. Additionally, you can attach wheels purchased at a furniture store. Use rope or jute twine as handles. 
3. Hide everything you don't need
Reinforce several plastic containers with plywood, and then sheathe them with any furniture fabric. If you want the bench to be softer and more comfortable, add several layers of synthetic winterizer between the fabric and plywood. Instead of a synthetic winterizer, you can use an old, failed, blanket. And instead of fabric, if desired, use a blanket. This solution is perfect for rental housing, because such furniture is easy to disassemble and use for other purposes. 
4. Use space wisely
Deep shelves are good because they can store a lot of products. But what is placed near the back wall is usually not easy to get. And if you still need something, you will have to turn all the supplies upside down. But if you put a simple plastic tray on such a shelf, the task will be greatly simplified. Now you have an analogue of a pull-out shelf, which, moreover, is very easy to wash. You can stick beautiful labels on the trays, and it will be even easier to maintain order. 
5. Organize a bureau
For some reason, such a convenient element of furniture for storage as a bureau has gone out of fashion. But in such a chest of drawers with a large number of sliding shelves it is very easy to store various small things and stationery. You can organize a "bureau" yourself by equipping an ordinary open chest of drawers with many containers of the same shape and size. In such boxes it is very convenient to store materials for needlework and working tools. And collected under one roof, the containers will look much more neat. 
6. Organize a zoo
It is convenient to collect all toys together in such a container. To equip it, you will need a woolen rope, cord or twine and wheels for furniture. Several animals can be fixed right on the edge of the box, and then it will be easier for the child to figure out what to put where. If the baby's room has room for several containers, you can assign different animals to be "responsible" for their kind of toys.

7. All in sight
The design of the children's room allows for such a democratic material as plastic. Therefore, containers can be left without additional finishing. Simply label each crate with a colored sticker labeled with a specific type of toy. And it will be very easy to find the right thing. 
8. Add some color
Small plastic chests of drawers drawers Great for storing cosmetics. And you can ennoble their appearance with the help of acrylic paint. It is most convenient to work with a spray can. You can choose several colors that harmonize with each other, and apply a pattern using a stencil. A handy item can now decorate a bedroom or bathroom. 
9. Use the space under the bed
In this case, the container is still proposed to be hidden. But to do this is very convenient and functional. A small handle and wheels allow you to use the space under the bed to store bedding. This design is suitable for those things that need to be hidden every day. You can save on pull-out lockers and afford a more comfortable mattress. 
10. Keep the hallway clean
In a large family, there are often a lot of pairs of shoes in the hallway. Therefore, a sense of disorder arises even in a clean room. Try storing your shoes in the pantry, with a separate drawer for each. To prevent shoes from getting mixed up, you can stick photos of family members on the personal compartments of a plastic chest of drawers. 
11. Everything is on the shelves
Large plastic containers are very convenient to store things that are rarely needed. You can fill a basement or pantry with such, and not worry that the desired item will be lost. Plastic boxes are designed in such a way that they can be stacked on top of each other. But if you need a thing that is stored below, the entire structure will have to be disassembled. Therefore, it is much more convenient to organize home-made racks from wooden beams. You can fill them up by purchasing new containers as needed.

12. Use every centimeter!
In order not to clutter up the floor and walls, you can arrange storage for things right under the roof. To implement such an idea, you will need a metal mesh shelf and many identical containers. Now things will not clutter up the usable space. Don't forget to bring a comfortable stepladder! 
13. And an advanced version ...
Various sizes and shapes of plastic containers allow you to use almost any place in the house for storage. It can be shelves under the ceiling, above the door, and in any other place. You can peep a couple of ideas in industrial buildings ...  Sort all the little things and find a place for each group. And it will be much easier to maintain order in the house!
In this article, we will analyze how to make original multi-colored pendants, bracelets and cool badges from the oven with your own hands at home.
Do-it-yourself plastic key chains
In order to make cool keychains and badges from the oven, we will need scissors, a hole punch, permanent markers or acrylic paint and, of course, transparent plastic packaging (container) for cakes, cookies, etc.
Look, the package must have an emblem with the number 6. Only completely flat transparent plastic, which is smooth, is suitable for us, we don’t need everything else. Since we don't need all the ribbed plastic, we just get rid of it.

Making plastic badges
We take a clerical knife and cut out only the plastic that we need, namely flat. Then we choose any pictures we like for the icons. The easiest way is to find them on the Internet through a smartphone or planets, so that it is more convenient to work. You need to choose larger images, because when heated in the oven, they will decrease in size by 5-7 times and become too small if you make them initially like this, but at the same time they will increase in thickness up to 3 mm.

After we have found the pictures that suit us, we take the plastic prepared in size, put it on top and transfer the image with a permanent marker, since it will not be erased in the future. At this stage, you can immediately decorate your product with colored markers. Also, if you draw well, you can draw your future badge on paper and then transfer it to plastic in the same way.

We take scissors and cut out our blanks. We move them to a baking sheet covered with parchment paper, otherwise you will hardly separate them from the baking sheet.


We set the oven to heat up to 150-170 degrees. Then we take a baking sheet with our blanks and place in the oven for a few minutes (2-3 minutes, it all depends on how the transformation process goes). Do not be alarmed when the blanks begin to curl up before your eyes. After about a minute, they will straighten up, but decrease in size. After this process, we take them out and lightly press something flat so that they straighten up to the end.
See what the blanks were and what our badges became after the oven


If you have not previously painted the blanks with permanent markers, then we take acrylic paint. We mix the colors we need and paint the icons on the back (required). The result is very cool icons, almost store quality.


Making fasteners for badges
Next, attach the pin to the back of the badge with super glue. For better adhesion of the glue to the surface, sprinkle the place of gluing with soda. If you make a hole in them, then these badges can be used as key chains. You can also create original multi-colored pendants and bracelets from them.

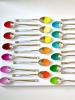
In order to get stylish jewelry, it is not necessary to spend a lot of money on buying them. You can make a necklace, earrings or. Moreover, from such materials that many, without hesitation, are thrown into the trash. For example, the bracelet you see in the photo is made from pieces of plastic cut from a disposable food container. Well, how interesting?
Master class: the necessary materials and tools for making a bracelet
For this master class, you will need a container (in supermarkets they sell salads and cakes) made of PS-6 polystyrene.
Eat everything edible, and wash the container with warm soapy water, removing the stickers and glue that remains after them. Let the container dry well.

In addition to the container, you will need:
Multi-colored permanent markers;
Sharp scissors;
6 mm jewelry rings;
Small pliers;
Hole punch (for punching holes in belts);
Electric oven or gas oven with the possibility of heating up to 120 degrees;
Polyurethane clear top coat (optional).
How to make a bracelet with your own hands
Cut off a flat part from the container and draw your drawing or pattern with markers (you can give the kids plenty of fun here). You can cut the plastic into small pieces of the desired size and paint them individually (if you are good at drawing miniatures).
Note: Buy thin markers so that the drawing is neat and clear. Dark colors become almost black after baking, so don't overdo them.

Cut a large piece with a pattern into small pieces of the desired size. In this master class, rectangles measuring 3.5x4.5 cm are made.
Punch four holes in the corners of each rectangle with a hole punch.

Use scissors or nail clippers to round off the corners of each rectangle.

Note: You can also sand the corners of the plastic after baking in the oven. But you can’t cut with scissors at this stage.
In this master class, the bracelet turned out to be baked. That is, the plastic parts of which it consists were baked in the oven.
Preheat oven to desired temperature. Place the plastic on a baking sheet lined with waxed paper. Place the tray in the oven. After 30 seconds, the plastic will begin to bend, but after a minute or two it will become smaller and straighten out. It's time to take the "pie" out of the oven.

Once the plastic straightens out (even if it took 30 seconds), remove the baking sheet from the oven. After cooling, you can cover the plastic with a top coat (optional).

If you decide to make the bracelet with a protective varnish coating, both quick-drying polyurethane varnish and clear nail polish will work for you. But not sprays with acetone-based acrylates, as they will lighten your paints (although this is also a good effect).
Now it's time to fasten the bracelet pieces together. Use jewelry rings for this, which are sold in needlework stores.
Open the first ring with pliers. Pass it through the hole in the first plastic link of the bracelet. Close the ring using pliers. Pass the next ring through it and immediately grab the next piece of plastic. Repeat on the other side of each piece.

Having fastened two elements with the help of rings, move in the same way to the end of the bracelet until you connect all the links.

At the ends of the bracelet, connect the rings, as shown in the photo. Attach the clasp for the bracelet on one side.

If necessary, on the opposite side of the clasp, at the end of the bracelet, instead of one ring, add a few more so that the bracelet can be “fitted to size”.
Now is the time to show off your new jewelry to your friends.
Note: Before you make such a bracelet, think about whether you might want to make some other jewelry to go with it. In the last photo you see a stylish pendant that matches the design of the bracelet. It can be made according to the same scenario, but made in a different size.
Poke one hole in it, bake in the oven. Lacquer if you painted the bracelet. Put the ring on the pendant, and attach it to a special wire for pendants, lace or chain. You can also buy them at a craft store.

And here is another idea for making a bracelet -.
SaveYou probably immediately throw them into the trash can - plastic packages in which we bring home cakes, ready-made salads from the supermarket, cookies ... But do not rush to get rid of them. With this trick, you can turn trash into an adorable masterpiece.
Need:
- plastic box
- scissors
- hole puncher
- colored permanent markers
Let's start:
We take a clean package and cut out the bottom (flat part).
You can choose any picture of your choice, the main thing is that it should be easy to copy. For example, a character from the beloved cartoon about Winnie the Pooh. Keep in mind that at the end the figure will decrease by about 70%, that is, initially the drawing should be large enough. We draw a picture on plastic.

Now we color the picture and use a hole punch to make a hole above the top of the picture. Cut out along the contour, grabbed a small "loop" with a hole on top.

We put the plastic blank on baking paper and "bake" for 2-3 minutes at 165 ° C. The heat will cause the plastic to shrink and curl, but don't worry, it will flatten out again in the end.

After baking, small plastic figures will become not only smooth, but also thick and strong. Now you can make such a charming bracelet out of them.

Once again, the whole process will show the video:
Sets of such plastic blanks with drawings are even sold in some children's stores - children are delighted with such a transformation. But why spend money if everything is at hand? You can choose any patterns, motifs and colors. Now what should have just rotted in a landfill will be pleasing to the eye for a long time to come. Beautiful and eco-friendly!
Every housewife strives for perfect cleanliness and order in the house, so all women try to get rid of excess rubbish as quickly as possible. But there is no need to be so categorical, for example, plastic food packaging is worth saving.
Today we will share with you the secret of creating a charming little thing from plastic containers. Children will be delighted with this idea, by the way, they can be involved in joint production.
YOU WILL NEED
plastic box
scissors
hole puncher
colored permanent markers
PROGRESS
Cut out the bottom of the package. All you need is the flat part of the plastic container. 
Print any outline picture. You can use coloring for this purpose. 
Redraw the picture on plastic using permanent markers. Keep in mind that the size of the figure will eventually decrease by about 70%. Therefore, initially the drawing should be large. 
Using a hole punch, make a small hole above the pattern and cut out a plastic figure along the contour. 
After preheating the oven to 165 degrees, place the plastic figures on a baking sheet lined with parchment paper. Bake the figurines for exactly 3 minutes. 
After baking, each of the figures will become smooth and more dense. Now they can be attached as a decoration to the bracelet. 
These figurines can also be used as New Year's toys to the tree! If you liked this idea for needlework, share the article with your friends.
My name is Irina, I live in Germany - in a country where absolutely everything is sold in plastic packaging, which migrates in tons from stores to trash cans. I've been doing it for a long time different types needlework and constantly face the issue of optimal storage of a bunch of little things that accumulate all the time and require new boxes, caskets, etc. In this master class, I want to show several ways to create convenient storage containers from various plastic packaging. The advantage of this kind of containers is that they are easily made at home, they can be made in any size and in any quantity, the transparency of the plastic allows you to quickly find the right thing, the material for containers can be found in every home, such containers for small items can also be used on cottage, garage, etc…
So, for starters, let's make the simplest mini-container from a plastic bottle:

We heat the tip of the knife to make it easier to start cutting the bottle. 
We cut the bottle into two parts with a knife. If the bottle has no edges, in order to avoid large errors when cutting, glue the adhesive tape at the desired height and cut the bottle exactly along the edge of the adhesive tape.


We will melt the edges of the bottle a little to avoid cuts to the hands during its further processing. The bottle should be kept at a distance of 0.5-1 cm from the flame, turning evenly. Rough edges after heat treatment will hide crocheting.

We heat up the steel knitting needle and make holes along the edge of the bottle, which will have to fit the size of the hook with which we will tie the edges of the bottle. 


When piercing plastic with a hot knitting needle, sharp and dark marks of plastic often remain on the surface. ... They can be removed in different ways, I use a regular grater to clean my feet (emery is too sharp - it damages the surface of the plastic, it is not very convenient with a knife) 
Now we start tying the edge with a crochet with a single crochet. 

We thread the end of the thread and glue it inside the container. 
Then we thread a thick thread into a gypsy needle and sew the entire row with colored thread, without missing a single hole. 

We tuck the end of the thread and glue it again. 
If desired, our small container can be decorated. The easiest way to decorate is double-sided tape, ribbon and rhinestones. You can also use winding threads on double-sided tape.

We cut the tape of the required length and glue it on double-sided tape. Cut off excess tape. 


We make a bow at the junction, you can stick a strass and the mini-container is ready! 
We make different containers of the required height and glue them with a gun into a larger and denser plastic package (in the photo, the package in which we sell food products) 

We apply hot glue to the bottom and quickly glue the container to the package (hold it for a while to grab it properly) 


We stick double-sided tape on our box, any tape or make a winding with threads, decorate with little things and our first little box for little things is ready! I made this box for a dacha to store various little things that you are always looking for in different drawers: pencils, small tools, keys, etc. 
If we take our containers out plastic bottles we will make a high harness, and we will thread the lace, then we will get pencil cases that can be both placed and hung. They take up little space and are easy to see. 


Another option for making boxes for storing small items: in it I used dense plastic cups from Danone yogurt. 
The principle of making the box is the same, if the height of the box allows, you can make two tiers of cups, using cardboard (or thick plastic) for the bottom of the second tier, on which I glued the plastic bottom from the package with hot glue. 

If desired, boxes for small items can be made with lids. For these purposes, I took old plastic folders, cut them to the size of the box and, having made holes with a hole punch or a hot knitting needle, sewed them together with the edge of the plastic box. Since I have a two-tiered plastic box in the photo, for convenience, I made a handle from the scraps of the folder, which I also glued with hot glue to the bottom of the second tier. 


Finishing elements are glued with hot glue. 

From large plastic bottles you can make excellent containers for storing small toys, parts from the designer, etc. for the children's room and kitchen. Decorating such containers can become a joint creativity for a parent and a child. The principle of creating such a large container is exactly the same as shown above. 


From the remaining upper parts of plastic bottles, we can make a lot of exotic flowers and decorate our balcony or summer cottage with them. But that's a topic for another tutorial!